> ## Documentation Index
> Fetch the complete documentation index at: https://dripart-matt-router-pricing-pika-and-guard.mintlify.site/llms.txt
> Use this file to discover all available pages before exploring further.
# ComfyUI Wan2.1 Video 示例
> 在 ComfyUI 中运行 Wan2.1 视频工作流:使用 1.3B 模型进行文生视频、使用 14B 模型进行图生视频,包括模型安装。
Wan2.1 Video 系列为阿里巴巴于 2025年2月开源的视频生成模型,其开源协议为 [Apache 2.0](https://github.com/Wan-Video/Wan2.1?tab=Apache-2.0-1-ov-file)。
该系列提供两个版本:
* 14B(140亿参数)
* 1.3B(13亿参数)
覆盖文生视频(T2V)、图生视频(I2V)等多项任务。
该模型不仅在性能上超越现有开源模型,更重要的是其轻量级版本仅需 8GB 显存即可运行,大大降低了使用门槛。
* [Wan2.1 代码仓库](https://github.com/Wan-Video/Wan2.1)
* [Wan2.1 模型仓库](https://huggingface.co/Wan-AI)
请确保你的 ComfyUI 已经更新。
* [ComfyUI 下载](https://www.comfy.org/download)
* [ComfyUI 更新教程](/zh/installation/update_comfyui)
本指南里的工作流可以在[工作流模板](/zh/interface/features/template)中找到。如果找不到,可能是 ComfyUI 没有更新。
如果加载工作流时有节点缺失,可能原因有:
1. 你用的不是最新版(每夜版)。
2. 启动时有些节点导入失败。
* [Cloud](https://cloud.comfy.org) 会在 ComfyUI 稳定版本发布后更新。
所以,如果你发现本文档中有任何核心节点缺失,可能是因为新核心节点尚未在最新稳定版中发布。请等待下一个稳定版发布。
## Wan2.1 ComfyUI 原生(native)工作流示例
开始示例之前,请先将 ComfyUI 更新到最新版本,以确保你拥有原生的 Wan Video 支持。
## 模型安装
本指南中提到的所有模型都可以在[这里](https://huggingface.co/Comfy-Org/Wan_2.1_ComfyUI_repackaged/tree/main/split_files)找到。以下是本指南中的示例所需的常见模型,你可以提前下载:
从**文本编码器**中选择一个版本下载:
FP16 精度文本编码器。放置于 ComfyUI/models/text\_encoders/
FP8 缩放文本编码器。放置于 ComfyUI/models/text\_encoders/
**VAE**
Wan2.1 VAE 模型。放置于 ComfyUI/models/vae/
**CLIP Vision**
用于图像条件的 CLIP Vision 模型。放置于 ComfyUI/models/clip\_vision/
文件保存位置:
```
ComfyUI/
├── models/
│ ├── diffusion_models/
│ │ └── ... (download per workflow below)
│ ├── text_encoders/
│ │ └── umt5_xxl_fp8_e4m3fn_scaled.safetensors
│ ├── vae/
│ │ └── wan_2.1_vae.safetensors
│ └── clip_vision/
│ └── clip_vision_h.safetensors
```
对于 diffusion 模型,本指南将使用 fp16 精度模型,因为我们发现它们比 bf16 版本表现更好。如果你需要其他精度的版本,请访问[这里](https://huggingface.co/Comfy-Org/Wan_2.1_ComfyUI_repackaged/tree/main/split_files/diffusion_models)下载。
## Wan2.1 文生视频工作流 (1.3B)

Wan 2.1 文生视频
使用 Wan 2.1 根据文本提示生成视频。
 在 Comfy Cloud 中打开
下载 JSON,或在模板库中搜索 "Wan 2.1 Text to Video"
### 模型下载
Wan2.1 文生视频扩散模型。放置于
在 Comfy Cloud 中打开
下载 JSON,或在模板库中搜索 "Wan 2.1 Text to Video"
### 模型下载
Wan2.1 文生视频扩散模型。放置于 ComfyUI/models/diffusion\_models/
> 如果你需要其他 t2v 精度版本,请前往[这里](https://huggingface.co/Comfy-Org/Wan_2.1_ComfyUI_repackaged/tree/main/split_files/diffusion_models)下载。
### 运行步骤
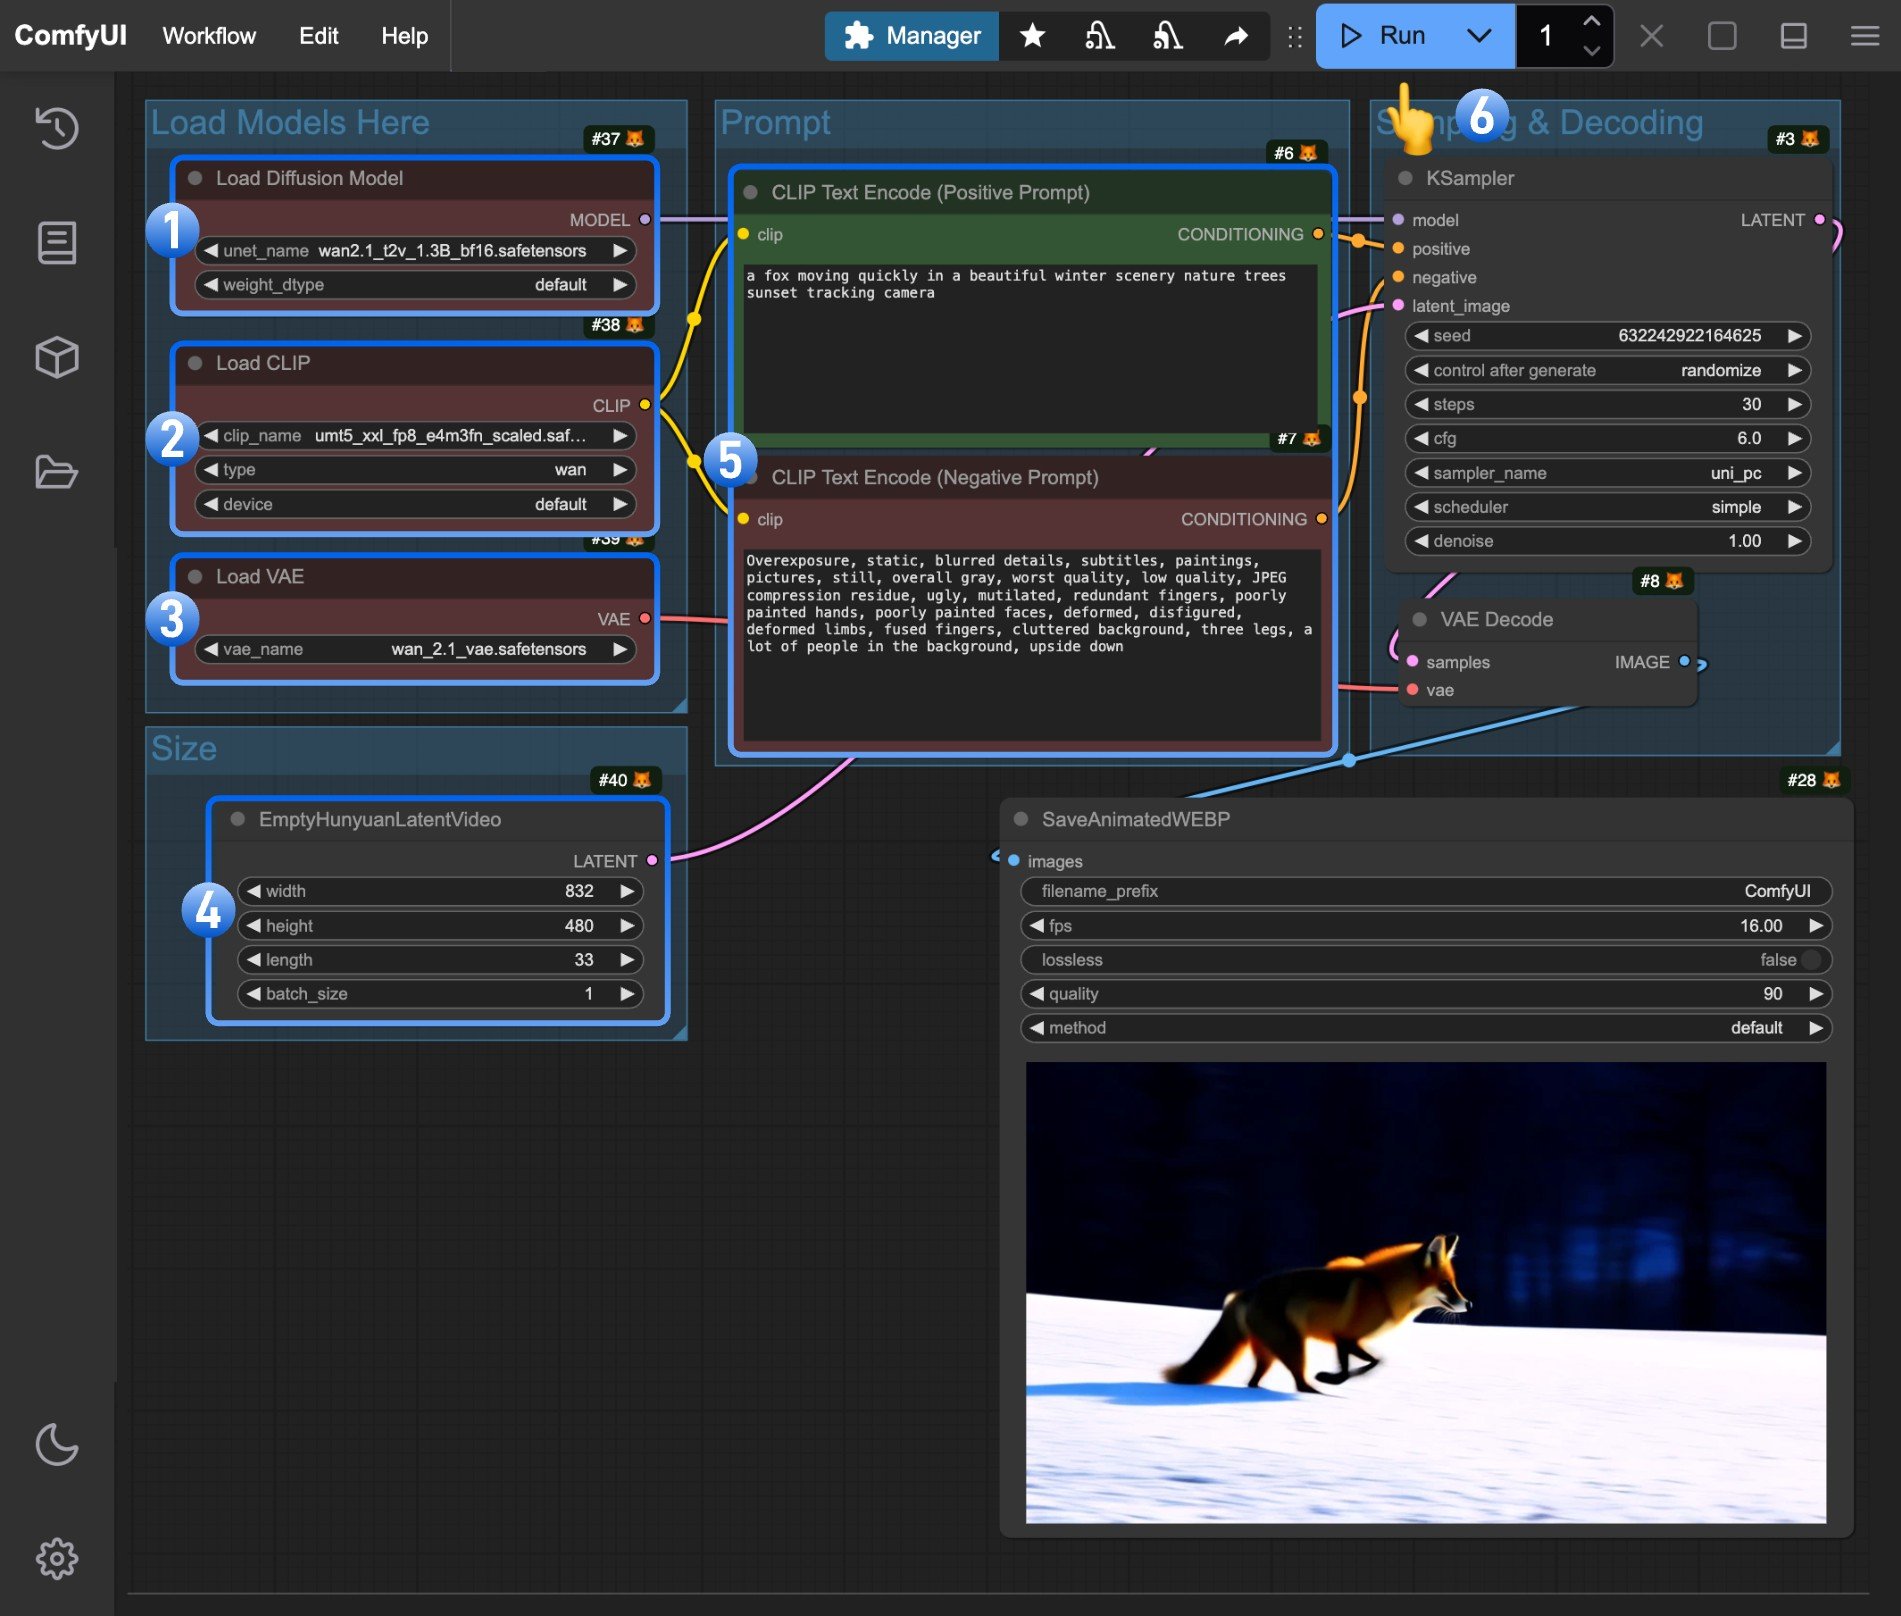 1. 确保 `Load Diffusion Model` 节点已加载 `wan2.1_t2v_1.3B_fp16.safetensors` 模型
2. 确保 `Load CLIP` 节点已加载 `umt5_xxl_fp8_e4m3fn_scaled.safetensors` 模型
3. 确保 `Load VAE` 节点已加载 `wan_2.1_vae.safetensors` 模型
4. (可选)如有需要,你可以在 `EmptyHunyuanLatentVideo` 节点中修改视频尺寸
5. (可选)如果你需要修改提示词(正向和负向),请在编号 `5` 的 `CLIP Text Encoder` 节点中进行修改
6. 点击 `Run` 按钮,或使用快捷键 `Ctrl(cmd) + Enter` 执行视频生成
## Wan2.1 图生视频工作流 (14B)
**由于 Wan Video 将 480P 和 720P 模型分开**,本指南需要为两种分辨率都提供示例。除了使用不同的模型外,它们的参数也略有不同。
### 480P 版本
1. 确保 `Load Diffusion Model` 节点已加载 `wan2.1_t2v_1.3B_fp16.safetensors` 模型
2. 确保 `Load CLIP` 节点已加载 `umt5_xxl_fp8_e4m3fn_scaled.safetensors` 模型
3. 确保 `Load VAE` 节点已加载 `wan_2.1_vae.safetensors` 模型
4. (可选)如有需要,你可以在 `EmptyHunyuanLatentVideo` 节点中修改视频尺寸
5. (可选)如果你需要修改提示词(正向和负向),请在编号 `5` 的 `CLIP Text Encoder` 节点中进行修改
6. 点击 `Run` 按钮,或使用快捷键 `Ctrl(cmd) + Enter` 执行视频生成
## Wan2.1 图生视频工作流 (14B)
**由于 Wan Video 将 480P 和 720P 模型分开**,本指南需要为两种分辨率都提供示例。除了使用不同的模型外,它们的参数也略有不同。
### 480P 版本
Wan 2.1 图生视频
使用 Wan 2.1 根据图像生成视频。
 在 Comfy Cloud 中打开
下载 JSON,或在模板库中搜索 "Wan 2.1 Image to Video"
**输入素材**
将此文件上传到对应的 `LoadImage` 节点:
`LoadImage` 节点 52 · `image_to_video_wan_start_image.png`
#### 模型下载
Wan2.1 I2V 480P 扩散模型。放置于
在 Comfy Cloud 中打开
下载 JSON,或在模板库中搜索 "Wan 2.1 Image to Video"
**输入素材**
将此文件上传到对应的 `LoadImage` 节点:
`LoadImage` 节点 52 · `image_to_video_wan_start_image.png`
#### 模型下载
Wan2.1 I2V 480P 扩散模型。放置于 ComfyUI/models/diffusion\_models/
#### 运行步骤
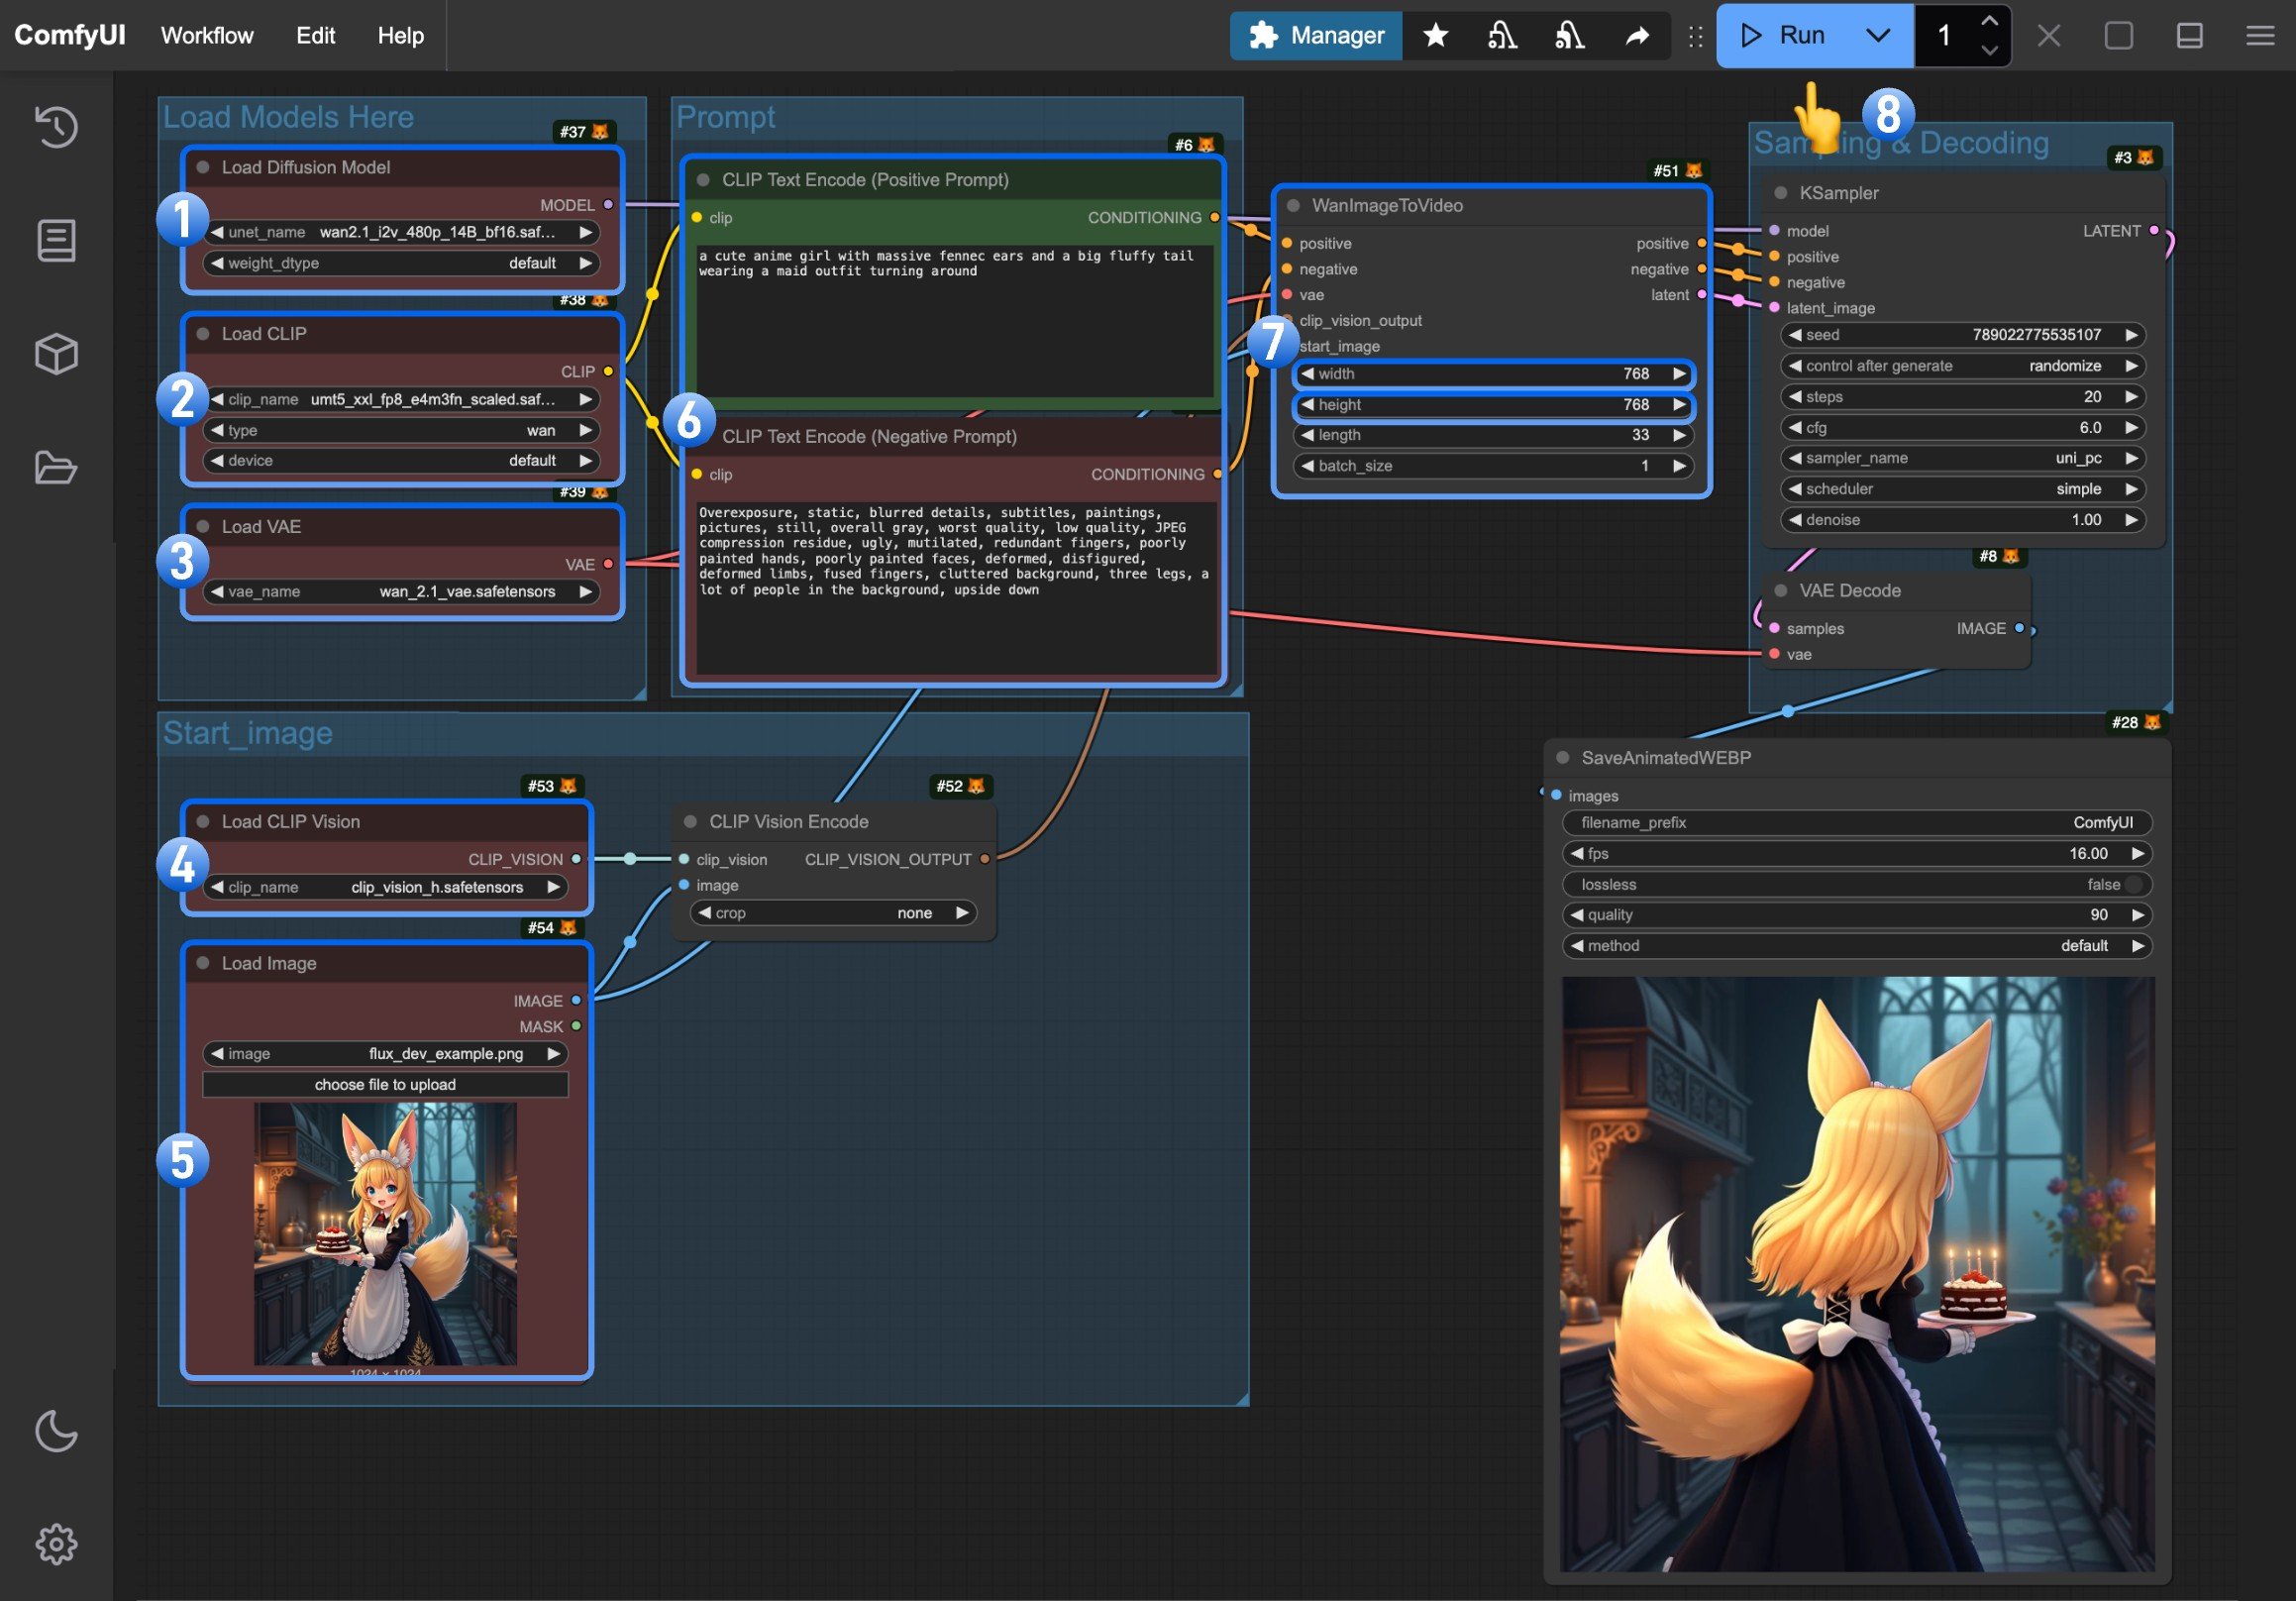 1. 确保 `Load Diffusion Model` 节点已加载 `wan2.1_i2v_480p_14B_fp16.safetensors` 模型
2. 确保 `Load CLIP` 节点已加载 `umt5_xxl_fp8_e4m3fn_scaled.safetensors` 模型
3. 确保 `Load VAE` 节点已加载 `wan_2.1_vae.safetensors` 模型
4. 确保 `Load CLIP Vision` 节点已加载 `clip_vision_h.safetensors` 模型
5. 在 `Load Image` 节点中上传提供的输入图像
6. (可选)在 `CLIP Text Encoder` 节点中输入你想要生成的视频描述内容
7. (可选)如有需要,你可以在 `WanImageToVideo` 节点中修改视频尺寸
8. 点击 `Run` 按钮,或使用快捷键 `Ctrl(cmd) + Enter` 执行视频生成
### 720P 版本

在 Comfy Cloud 中打开
下载工作流图片并将其拖入 ComfyUI 即可加载工作流
下载默认输入图像,或使用你自己的图像。
#### 模型下载
Wan2.1 I2V 720P 扩散模型。放置于
1. 确保 `Load Diffusion Model` 节点已加载 `wan2.1_i2v_480p_14B_fp16.safetensors` 模型
2. 确保 `Load CLIP` 节点已加载 `umt5_xxl_fp8_e4m3fn_scaled.safetensors` 模型
3. 确保 `Load VAE` 节点已加载 `wan_2.1_vae.safetensors` 模型
4. 确保 `Load CLIP Vision` 节点已加载 `clip_vision_h.safetensors` 模型
5. 在 `Load Image` 节点中上传提供的输入图像
6. (可选)在 `CLIP Text Encoder` 节点中输入你想要生成的视频描述内容
7. (可选)如有需要,你可以在 `WanImageToVideo` 节点中修改视频尺寸
8. 点击 `Run` 按钮,或使用快捷键 `Ctrl(cmd) + Enter` 执行视频生成
### 720P 版本

在 Comfy Cloud 中打开
下载工作流图片并将其拖入 ComfyUI 即可加载工作流
下载默认输入图像,或使用你自己的图像。
#### 模型下载
Wan2.1 I2V 720P 扩散模型。放置于 ComfyUI/models/diffusion\_models/
#### 运行步骤
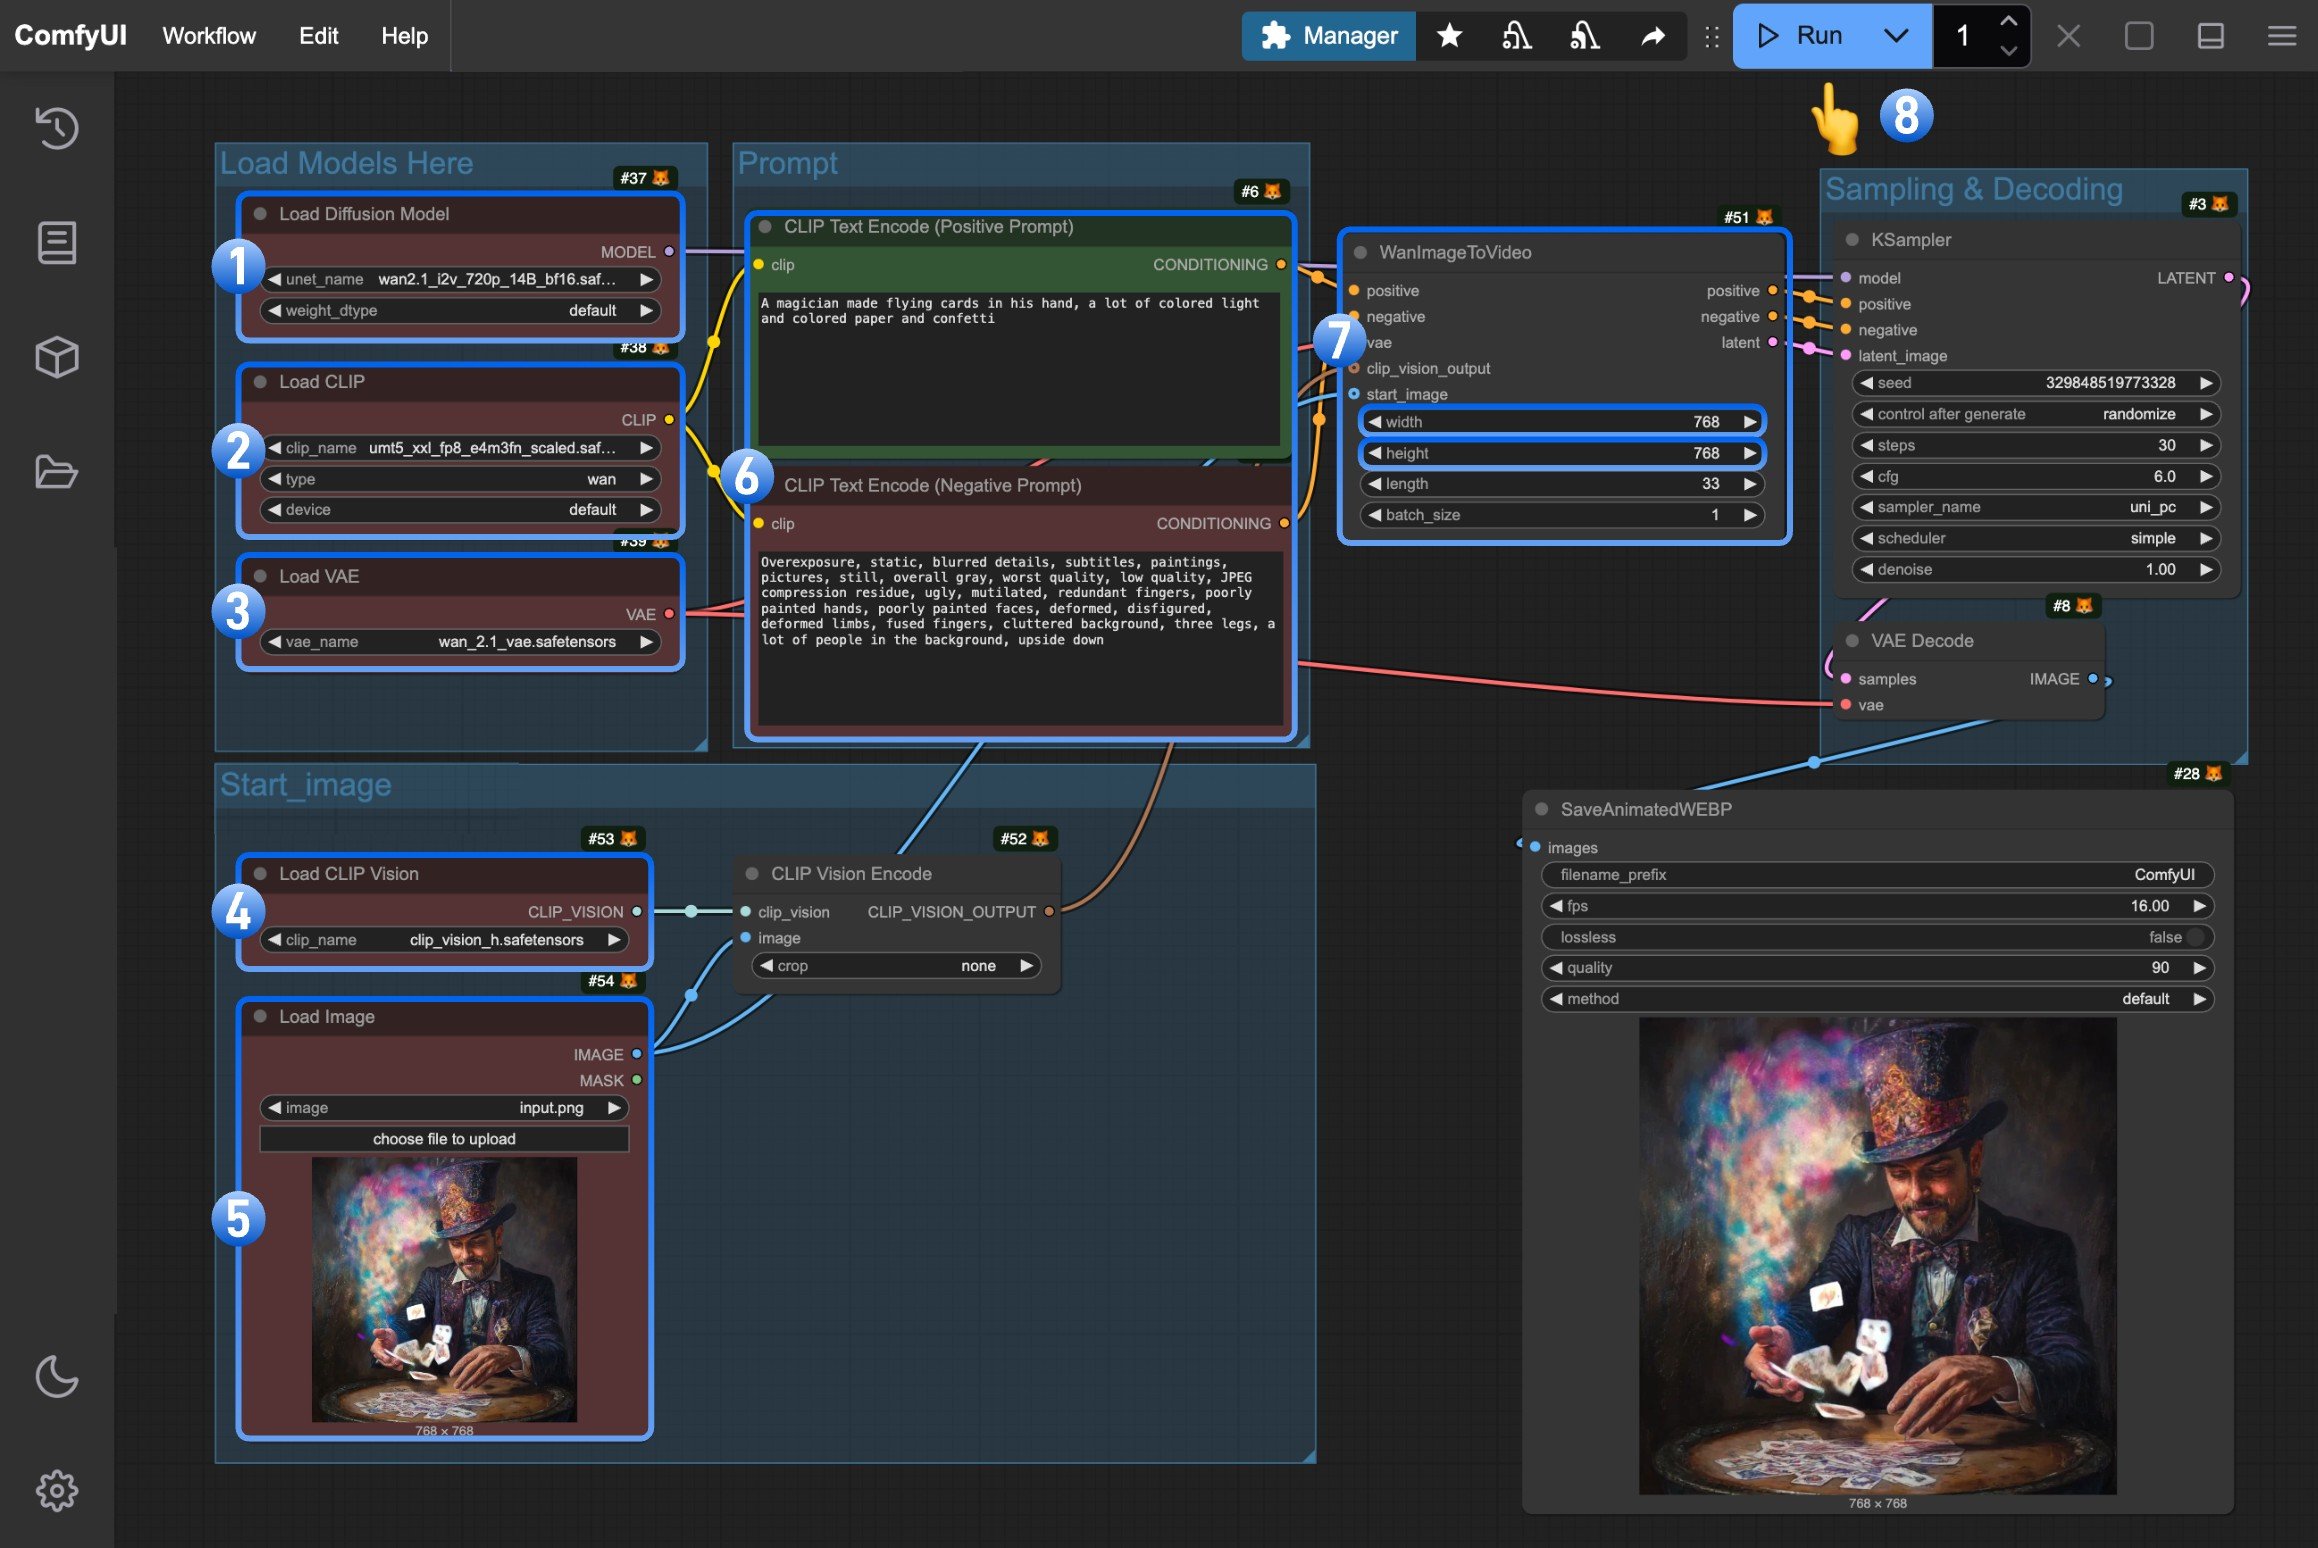 1. 确保 `Load Diffusion Model` 节点已加载 `wan2.1_i2v_720p_14B_fp16.safetensors` 模型
2. 确保 `Load CLIP` 节点已加载 `umt5_xxl_fp8_e4m3fn_scaled.safetensors` 模型
3. 确保 `Load VAE` 节点已加载 `wan_2.1_vae.safetensors` 模型
4. 确保 `Load CLIP Vision` 节点已加载 `clip_vision_h.safetensors` 模型
5. 在 `Load Image` 节点中上传提供的输入图像
6. (可选)在 `CLIP Text Encoder` 节点中输入你想要生成的视频描述内容
7. (可选)如有需要,你可以在 `WanImageToVideo` 节点中修改视频尺寸
8. 点击 `Run` 按钮,或使用快捷键 `Ctrl(cmd) + Enter` 执行视频生成
This documentation is built and hosted on [Mintlify](https://mintlify.com), a developer documentation platform.
1. 确保 `Load Diffusion Model` 节点已加载 `wan2.1_i2v_720p_14B_fp16.safetensors` 模型
2. 确保 `Load CLIP` 节点已加载 `umt5_xxl_fp8_e4m3fn_scaled.safetensors` 模型
3. 确保 `Load VAE` 节点已加载 `wan_2.1_vae.safetensors` 模型
4. 确保 `Load CLIP Vision` 节点已加载 `clip_vision_h.safetensors` 模型
5. 在 `Load Image` 节点中上传提供的输入图像
6. (可选)在 `CLIP Text Encoder` 节点中输入你想要生成的视频描述内容
7. (可选)如有需要,你可以在 `WanImageToVideo` 节点中修改视频尺寸
8. 点击 `Run` 按钮,或使用快捷键 `Ctrl(cmd) + Enter` 执行视频生成
This documentation is built and hosted on [Mintlify](https://mintlify.com), a developer documentation platform.