> ## Documentation Index
> Fetch the complete documentation index at: https://dripart-matt-router-pricing-pika-and-guard.mintlify.site/llms.txt
> Use this file to discover all available pages before exploring further.
# ComfyUI OmniGen2 原生工作流示例
> 在 ComfyUI 中原生运行 OmniGen2,完成文生图、指令式图像编辑和多图组合生成。
OmniGen2 是 VectorSpaceLab 团队开源的统一多模态生成模型,同一套权重同时支持文生图、指令引导的图像编辑和以参考图为主体的上下文生成。ComfyUI 原生支持 OmniGen2,以上三类任务都可以通过官方示例工作流在本地完成。
模型由一个冻结的 3B Qwen2.5-VL 视觉语言模型和一个独立的 4B 扩散 Transformer 组成,总参数量约 7B。视觉语言模型负责读取参考图像和文字指令,扩散 Transformer 负责把这些理解转化为图像。由于两条路径各自保留参数和图像分词器,OmniGen2 在保持视觉理解能力的同时也保证了图像质量。
ComfyUI 为这个模型提供了两个官方工作流:文生图,以及用“把裙子改成蓝色”这类自然语言指令做图像编辑。图像编辑工作流也支持多图合成,可以把多张输入图中的人物、参考对象和场景组合起来。
请确保你的 ComfyUI 已经更新。
* [ComfyUI 下载](https://www.comfy.org/download)
* [ComfyUI 更新教程](/zh/installation/update_comfyui)
本指南里的工作流可以在[工作流模板](/zh/interface/features/template)中找到。如果找不到,可能是 ComfyUI 没有更新。
如果加载工作流时有节点缺失,可能原因有:
1. 你用的不是最新版(每夜版)。
2. 启动时有些节点导入失败。
* [Cloud](https://cloud.comfy.org) 会在 ComfyUI 稳定版本发布后更新。
所以,如果你发现本文档中有任何核心节点缺失,可能是因为新核心节点尚未在最新稳定版中发布。请等待下一个稳定版发布。
**模型亮点**:
* **视觉理解**:通过 Qwen2.5-VL 基础模型读取和分析图像内容
* **文生图生成**:从文本提示生成高保真图像
* **指令引导的图像编辑**:用自然语言指令完成复杂修改
* **上下文生成**:将多张输入图中的人物、参考对象和场景组合成新图像
**技术特性**:
* **双路径架构**:3B Qwen2.5-VL 文本模型加独立的 4B 扩散 Transformer
* **Omni-RoPE 位置编码**:支持多图像空间定位和身份区分
* **参数解耦**:避免文本自回归生成影响图像质量
* **图内文字**:可以在生成的图像中呈现清晰文字
## OmniGen2 模型下载
由于本文涉及不同工作流,对应的模型文件及安装位置如下,对应工作流中也已包含了模型文件下载信息:
**Diffusion Models)**
* [omnigen2\_fp16.safetensors](https://huggingface.co/Comfy-Org/Omnigen2_ComfyUI_repackaged/resolve/main/split_files/diffusion_models/omnigen2_fp16.safetensors)
**VAE**
* [ae.safetensors](https://huggingface.co/Comfy-Org/Lumina_Image_2.0_Repackaged/resolve/main/split_files/vae/ae.safetensors)
**Text Encoders)**
* [qwen\_2.5\_vl\_fp16.safetensors](https://huggingface.co/Comfy-Org/Omnigen2_ComfyUI_repackaged/resolve/main/split_files/text_encoders/qwen_2.5_vl_fp16.safetensors)
文件保存位置:
```
📂 ComfyUI/
├── 📂 models/
│ ├── 📂 diffusion_models/
│ │ └── omnigen2_fp16.safetensors
│ ├── 📂 vae/
│ │ └── ae.safetensors
│ └── 📂 text_encoders/
│ └── qwen_2.5_vl_fp16.safetensors
```
## ComfyUI OmniGen2 文生图工作流
OmniGen2:文生图
使用 OmniGen2 统一 7B 多模态模型(采用双路径架构),根据文本提示词生成高质量图像。
 直接在 Comfy Cloud 中打开并运行此工作流
下载 JSON,或在模板库中搜索“OmniGen2”
**示例输出**

### 1. 下载工作流文件
### 2. 按步骤完成工作流运行
直接在 Comfy Cloud 中打开并运行此工作流
下载 JSON,或在模板库中搜索“OmniGen2”
**示例输出**

### 1. 下载工作流文件
### 2. 按步骤完成工作流运行
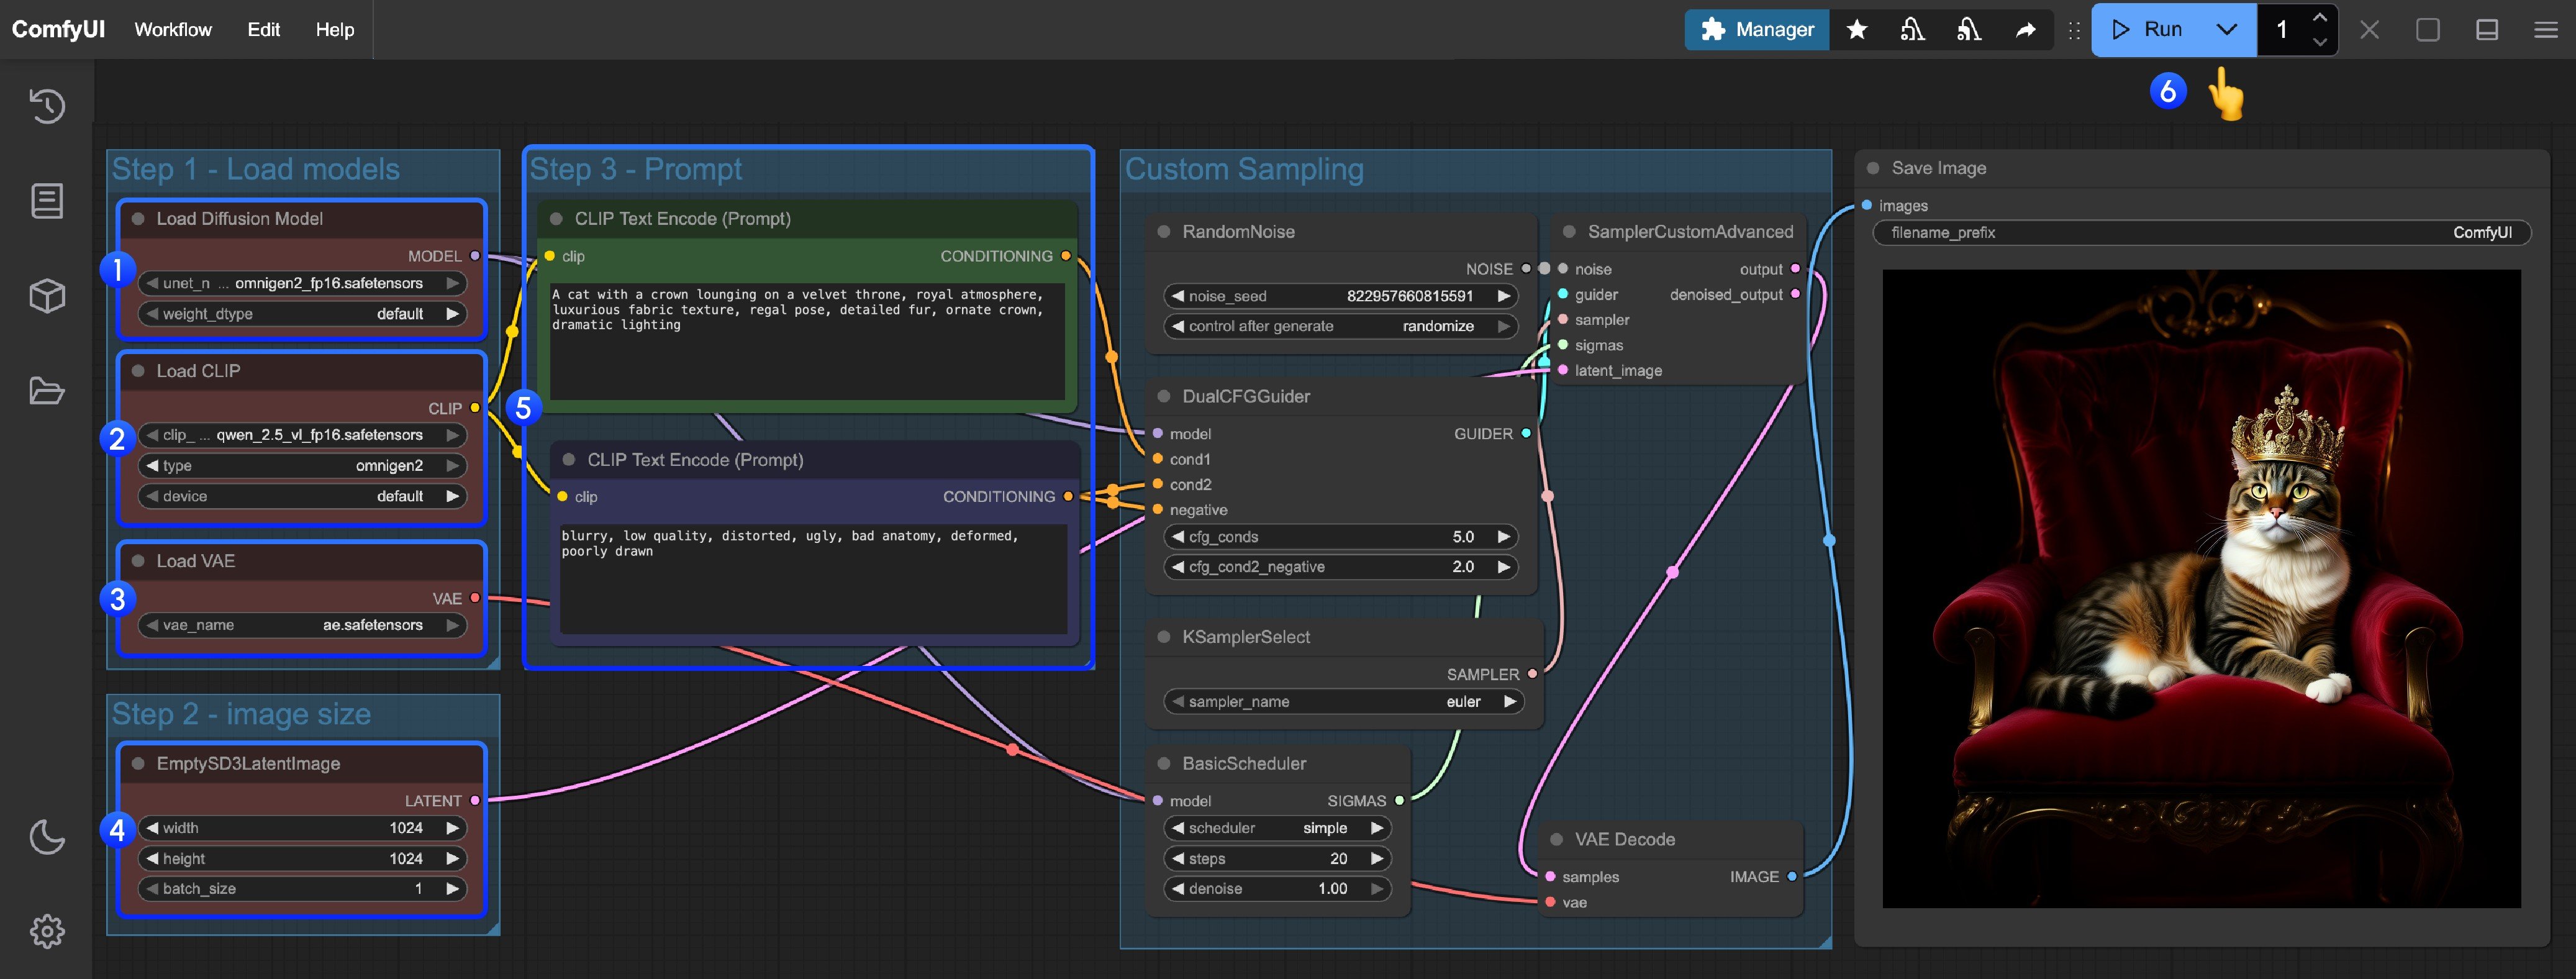 请参照图片中的编号步骤逐步确认,以确保对应工作流的顺利运行:
1. **加载主模型**:确保 `Load Diffusion Model` 节点加载了 `omnigen2_fp16.safetensors`
2. **加载文本编码器**:确保 `Load CLIP` 节点加载了 `qwen_2.5_vl_fp16.safetensors`
3. **加载 VAE**:确保 `Load VAE` 节点加载了 `ae.safetensors`
4. **设置图像尺寸**:在 `EmptySD3LatentImage` 节点中设置生成图像的尺寸(推荐 1024x1024)
5. **输入提示词**:
* 在第一个 `CLipTextEncode` 节点中输入正向提示词(希望出现在图像中的内容)
* 在第二个 `CLipTextEncode` 节点中输入负向提示词(不希望出现在图像中的内容)
6. **开始生成**:点击 `Queue Prompt` 按钮,或使用快捷键 `Ctrl(cmd) + Enter` 来执行文生图生成
7. **查看结果**:生成完成后,对应的图像将自动保存到 `ComfyUI/output/` 目录中,你也可以在 `SaveImage` 节点中预览
## ComfyUI OmniGen2 图片编辑工作流
OmniGen2 有丰富的图像编辑能力,并且支持为图像添加文本
请参照图片中的编号步骤逐步确认,以确保对应工作流的顺利运行:
1. **加载主模型**:确保 `Load Diffusion Model` 节点加载了 `omnigen2_fp16.safetensors`
2. **加载文本编码器**:确保 `Load CLIP` 节点加载了 `qwen_2.5_vl_fp16.safetensors`
3. **加载 VAE**:确保 `Load VAE` 节点加载了 `ae.safetensors`
4. **设置图像尺寸**:在 `EmptySD3LatentImage` 节点中设置生成图像的尺寸(推荐 1024x1024)
5. **输入提示词**:
* 在第一个 `CLipTextEncode` 节点中输入正向提示词(希望出现在图像中的内容)
* 在第二个 `CLipTextEncode` 节点中输入负向提示词(不希望出现在图像中的内容)
6. **开始生成**:点击 `Queue Prompt` 按钮,或使用快捷键 `Ctrl(cmd) + Enter` 来执行文生图生成
7. **查看结果**:生成完成后,对应的图像将自动保存到 `ComfyUI/output/` 目录中,你也可以在 `SaveImage` 节点中预览
## ComfyUI OmniGen2 图片编辑工作流
OmniGen2 有丰富的图像编辑能力,并且支持为图像添加文本
OmniGen2 图像编辑
使用 OmniGen2 高级的图像编辑能力和文字渲染支持,通过自然语言指令编辑图像。
 在 Comfy Cloud 中直接打开并运行此工作流
下载 JSON,或在模板库中搜索 "OmniGen2 Image Edit"
**输入素材**
将此文件上传到对应的 `LoadImage` 节点:
`LoadImage` 节点 16 · `image_omnigen2_image_edit_input_image.png`
**示例输出**
### 1. 工作流文件下载
### 2. 按步骤完成工作流运行
在 Comfy Cloud 中直接打开并运行此工作流
下载 JSON,或在模板库中搜索 "OmniGen2 Image Edit"
**输入素材**
将此文件上传到对应的 `LoadImage` 节点:
`LoadImage` 节点 16 · `image_omnigen2_image_edit_input_image.png`
**示例输出**
### 1. 工作流文件下载
### 2. 按步骤完成工作流运行
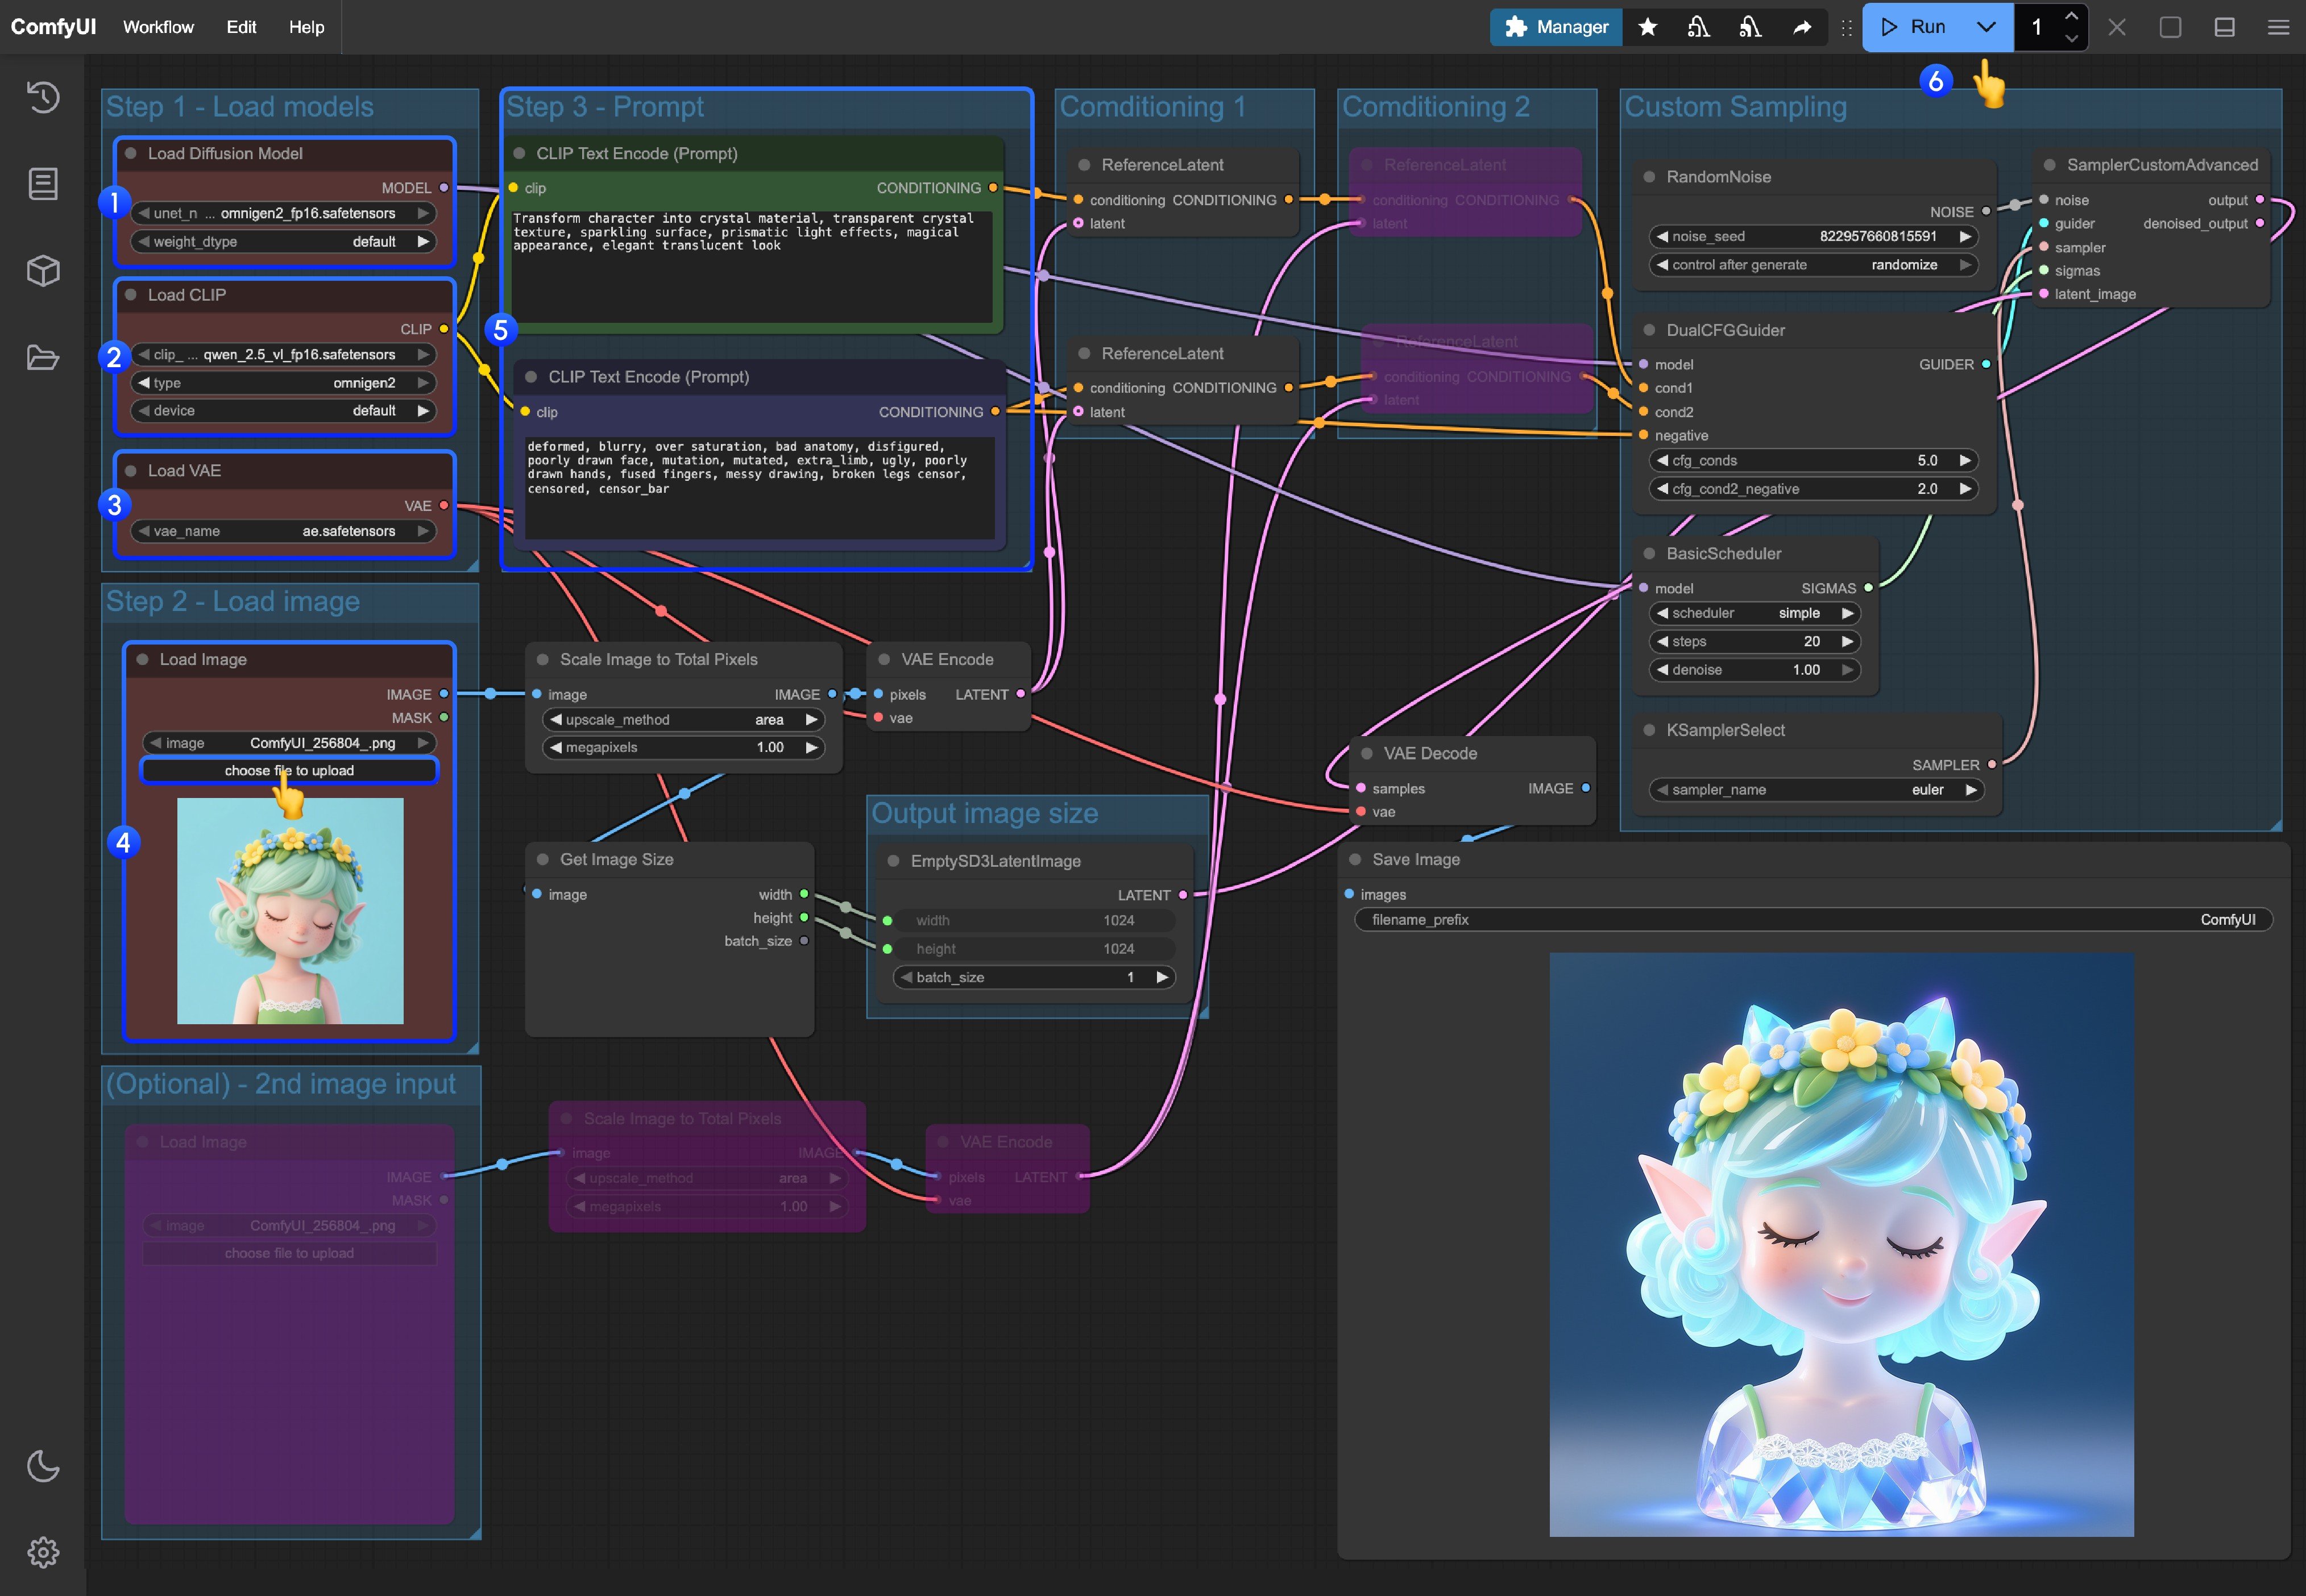 1. **加载主模型**:确保 `Load Diffusion Model` 节点加载了 `omnigen2_fp16.safetensors`
2. **加载文本编码器**:确保 `Load CLIP` 节点加载了 `qwen_2.5_vl_fp16.safetensors`
3. **加载 VAE**:确保 `Load VAE` 节点加载了 `ae.safetensors`
4. **上传图像**:在 `Load Image` 节点中上传提供的图片
5. **输入提示词**:
* 在第一个 `CLipTextEncode` 节点中输入正向提示词(想要出现在图像中的内容)
* 在第二个 `CLipTextEncode` 节点中输入负向提示词(不想要出现在图像中的内容)
6. **开始生成**:点击 `Queue Prompt` 按钮,或使用快捷键 `Ctrl(cmd) + Enter(回车)` 来执行文生图
7. **查看结果**:生成完成后对应的图片会自动保存到 `ComfyUI/output/` 目录下,你也可以在 `SaveImage` 节点中预览
### 3. 工作流补充说明
* 如果你想要启用第二张图像输入 ,你可以将工作流中状态为粉紫色的节点使用快捷键 **Ctrl + B** 来启用对应的节点输入
* 如果你想要自定义尺寸 ,可以删除链接 `EmptySD3LatentImage` 节点的 `Get image size` 节点,并输入自定义尺寸
This documentation is built and hosted on [Mintlify](https://mintlify.com), a developer documentation platform.
1. **加载主模型**:确保 `Load Diffusion Model` 节点加载了 `omnigen2_fp16.safetensors`
2. **加载文本编码器**:确保 `Load CLIP` 节点加载了 `qwen_2.5_vl_fp16.safetensors`
3. **加载 VAE**:确保 `Load VAE` 节点加载了 `ae.safetensors`
4. **上传图像**:在 `Load Image` 节点中上传提供的图片
5. **输入提示词**:
* 在第一个 `CLipTextEncode` 节点中输入正向提示词(想要出现在图像中的内容)
* 在第二个 `CLipTextEncode` 节点中输入负向提示词(不想要出现在图像中的内容)
6. **开始生成**:点击 `Queue Prompt` 按钮,或使用快捷键 `Ctrl(cmd) + Enter(回车)` 来执行文生图
7. **查看结果**:生成完成后对应的图片会自动保存到 `ComfyUI/output/` 目录下,你也可以在 `SaveImage` 节点中预览
### 3. 工作流补充说明
* 如果你想要启用第二张图像输入 ,你可以将工作流中状态为粉紫色的节点使用快捷键 **Ctrl + B** 来启用对应的节点输入
* 如果你想要自定义尺寸 ,可以删除链接 `EmptySD3LatentImage` 节点的 `Get image size` 节点,并输入自定义尺寸
This documentation is built and hosted on [Mintlify](https://mintlify.com), a developer documentation platform.