> ## Documentation Index
> Fetch the complete documentation index at: https://dripart-matt-router-pricing-pika-and-guard.mintlify.site/llms.txt
> Use this file to discover all available pages before exploring further.
# ComfyUI-Manager 安装
> 在 Desktop、便携版或手动安装的 ComfyUI 上安装 ComfyUI-Manager,在应用内搜索、安装和更新自定义节点。
## 桌面版用户
Comfy Desktop 在每次安装 ComfyUI 时都会一并安装 ComfyUI-Manager,并以 `--enable-manager` 启动它,因此你无需自行安装。管理器按安装实例在应用内进行配置:
在 Comfy Desktop 中打开该安装实例,进入 **Manage panel**,然后切换到 **Startup Args** 选项卡。
* **Manager Security Level** 决定管理器可以安装哪些节点包:**Strict**、**Standard**(推荐)、**Relaxed** 或 **Permissive**。当 ComfyUI 通过 `--listen` 暴露到网络时,更严格的级别尤为重要
* **Manager Network Mode** 决定管理器如何访问节点注册表:**Public**(默认)、**Private**、**Offline** 或 **Personal cloud**(仅适用于你自己控制的机器)
这两个选项都会在你下次启动该安装实例时生效。
同一选项卡上的 **Startup Arguments** 控制该安装实例启动时使用的标志。移除 `--enable-manager`,即可在不带管理器的情况下运行 ComfyUI;也可以保留它并添加 `--disable-manager-ui`,以隐藏管理器界面,同时让它的后台任务继续运行。
参见 [Startup Args 选项卡](/zh/installation/desktop/usage/manage#启动参数标签页) 了解其余按安装实例生效的设置,并参见 [启动标志参考](/zh/development/comfyui-server/startup-flags) 了解管理器相关的标志。
## 便携版用户
对于使用 [Windows 便携版](/zh/installation/comfyui_portable_windows) 的用户,新版 ComfyUI-Manager 已内置于 ComfyUI 核心中,但需要启用。
1. 安装管理器依赖:
```bash theme={null}
.\python_embeded\python.exe -m pip install -r ComfyUI\manager_requirements.txt
```
2. 启用管理器启动 ComfyUI:
```bash theme={null}
.\python_embeded\python.exe -s ComfyUI\main.py --windows-standalone-build --enable-manager
pause
```
## 手动安装用户
对于[手动安装](/zh/installation/manual_install)的用户,新版 ComfyUI-Manager 已内置于 ComfyUI 核心中,但需要启用。
1. 激活虚拟环境:
```bash theme={null}
# Windows
venv\Scripts\activate
# Linux/macOS
source venv/bin/activate
```
2. 安装管理器依赖:
```bash theme={null}
pip install -r manager_requirements.txt
```
3. 运行 ComfyUI 时使用 `--enable-manager` 标志启用管理器:
```bash theme={null}
python main.py --enable-manager
```
### 命令行选项
| 标志 | 描述 |
| - | - |
| `--enable-manager` | 启用 ComfyUI-Manager |
| `--enable-manager-legacy-ui` | 使用旧版管理器 UI 而非新版 UI(需要 `--enable-manager`) |
| `--disable-manager-ui` | 禁用管理器 UI 和端点,同时保留后台功能(需要 `--enable-manager`) |
### 切换新旧版UI
以下版本更新仅支持 pip 版本, 通过自定义节点方式安装的版本不支持切换到新版 UI
使用新版本 UI
```bash theme={null}
python main.py --enable-manager
```
使用旧版UI
```bash theme={null}
python main.py --enable-manager --enable-manager-legacy-ui
```
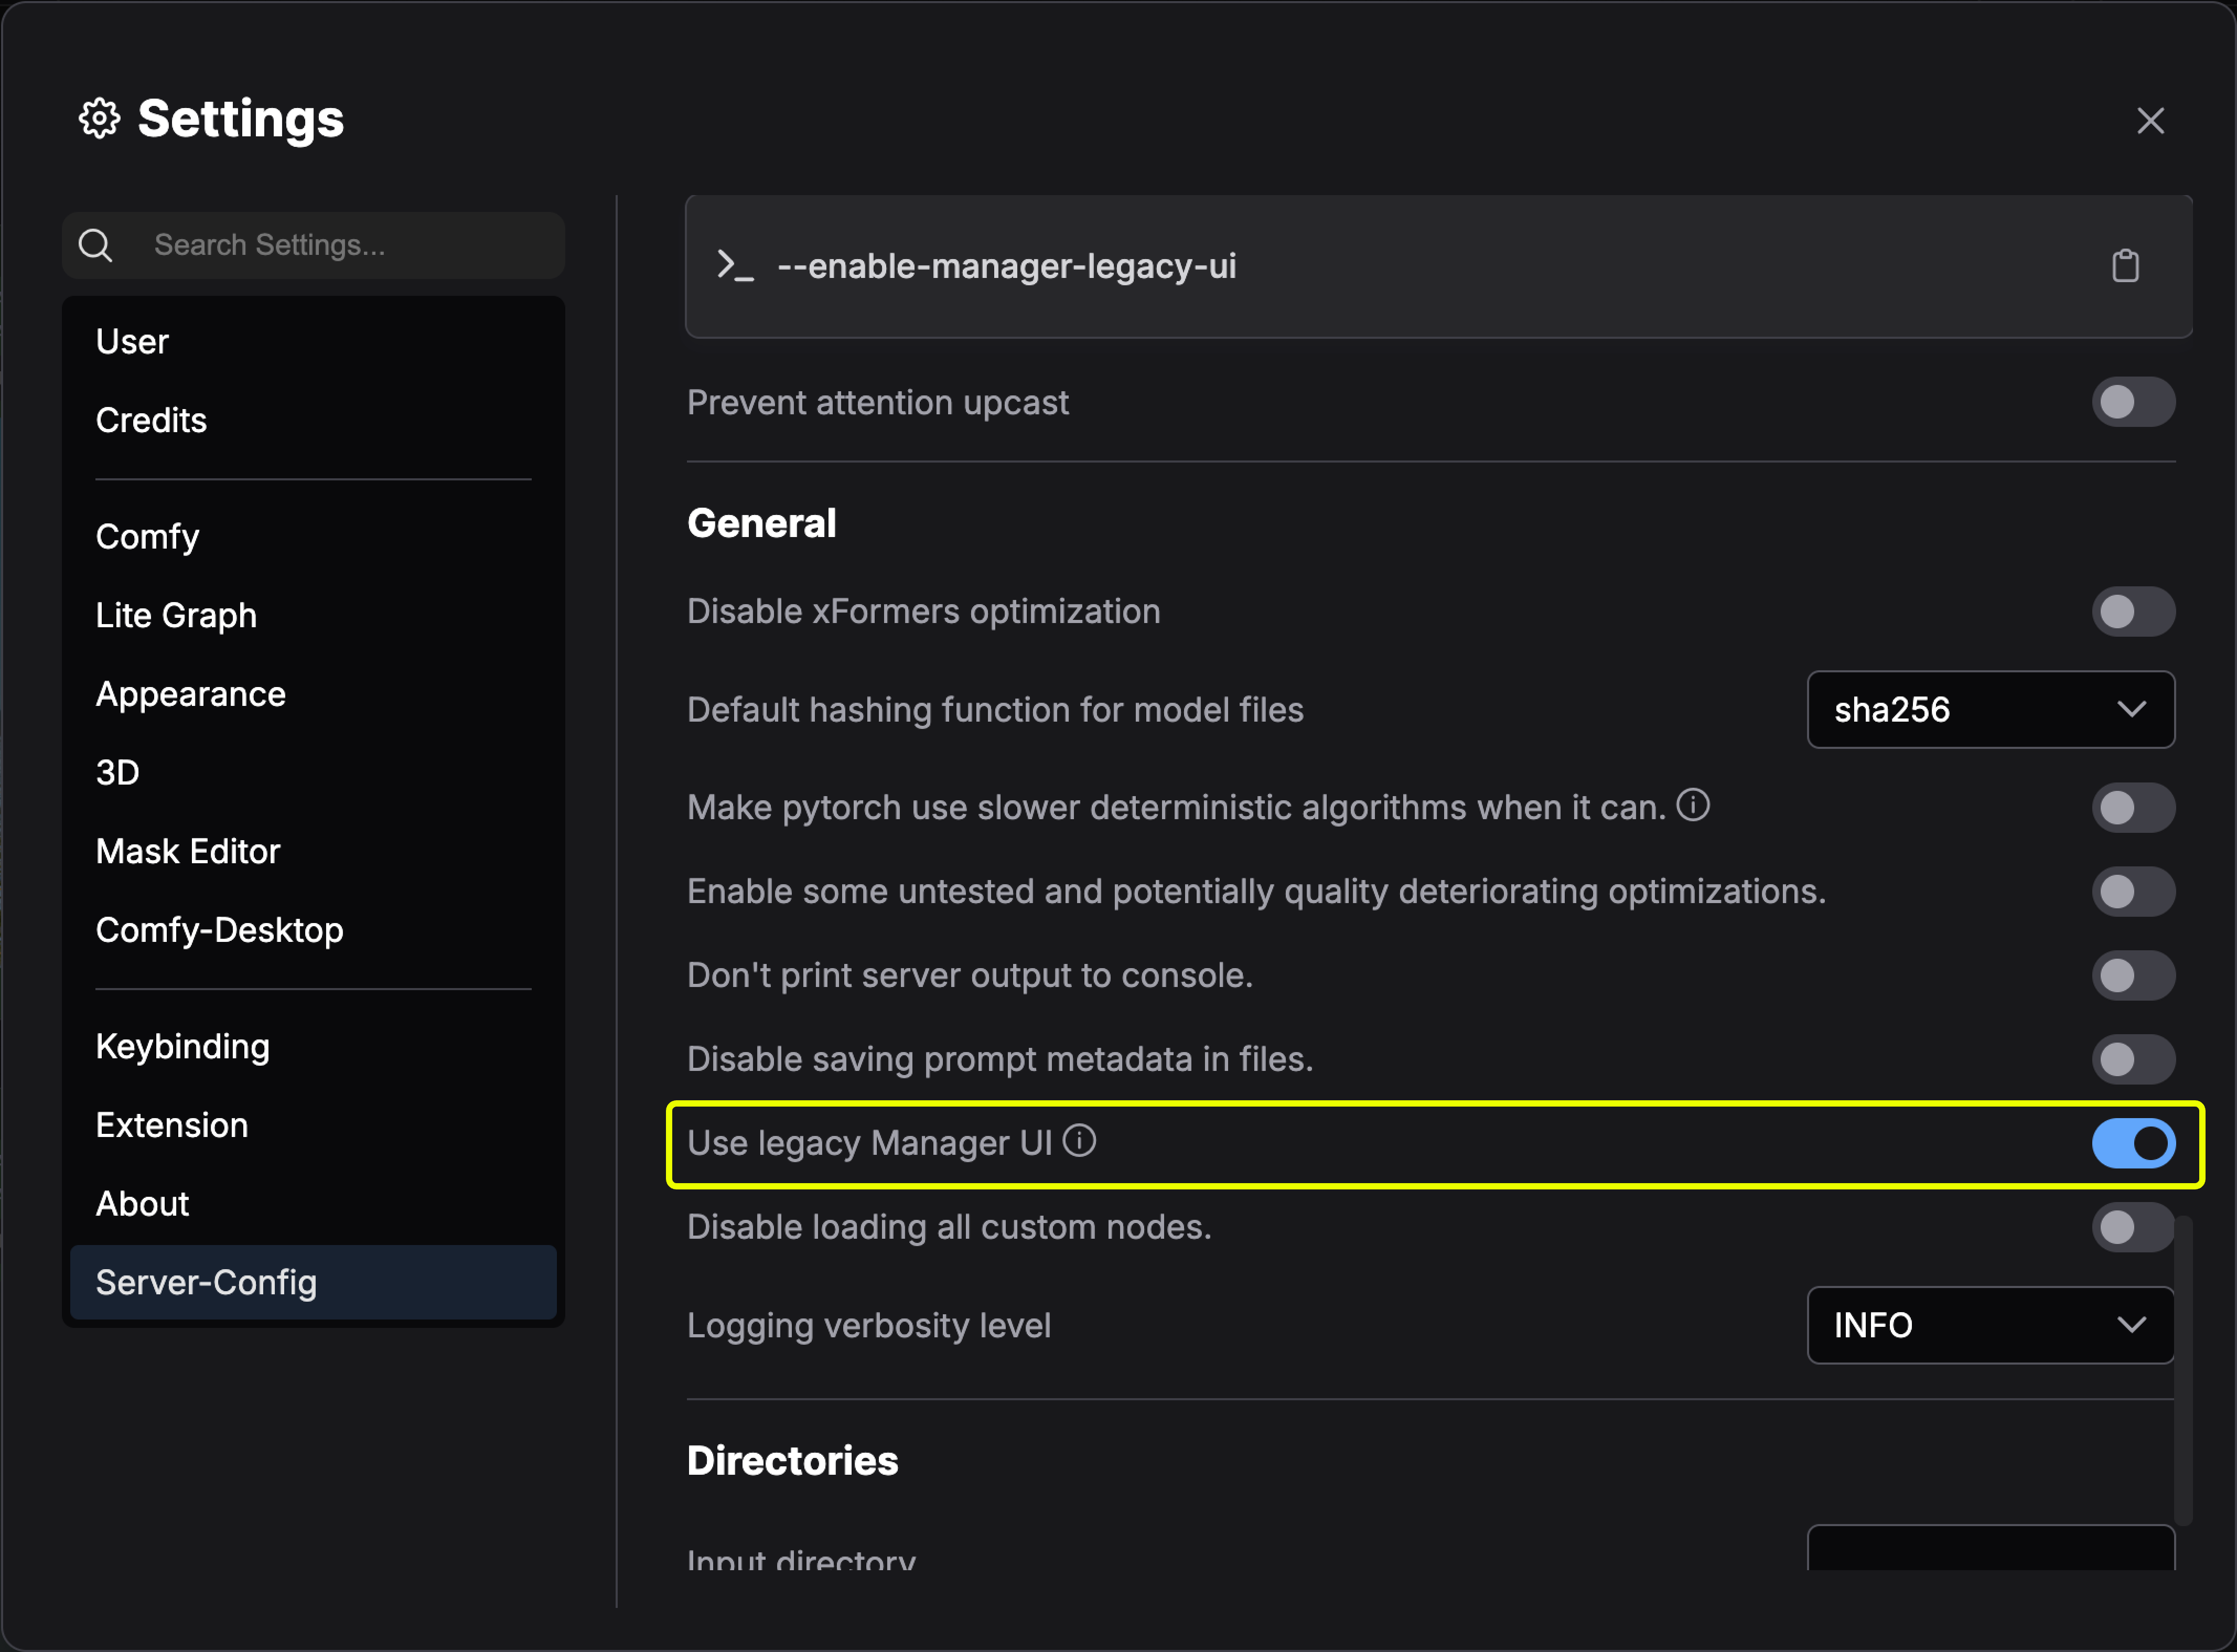
桌面版请在 服务器设置 -> UI 设置 -> 使用旧版管理器界面 切换到旧版 UI
 ## 更新 ComfyUI-Manager
ComfyUI-Manager 是与 ComfyUI 本体分开的 Python 包,ComfyUI 本体通过 `manager_requirements.txt` 固定它所对应的版本。管理器的更新方式取决于 ComfyUI 的安装方式:
桌面版内置管理器,并随 Comfy Desktop 的更新保持为最新。请从[管理面板](/zh/installation/desktop/usage/manage#更新选项卡)更新 ComfyUI 引擎。
更新 ComfyUI 后,已安装的管理器包可能不会随之更新。请在启动 ComfyUI 的环境中安装管理器依赖,并使用 `--enable-manager` 重启 ComfyUI:
```bash theme={null}
# 便携版(Windows)
.\python_embeded\python.exe -m pip install -r ComfyUI\manager_requirements.txt
.\python_embeded\python.exe -s ComfyUI\main.py --windows-standalone-build --enable-manager
# 手动安装
pip install -r manager_requirements.txt
python main.py --enable-manager
```
如果你自己将管理器克隆到了 `custom_nodes` 中:
```bash theme={null}
cd ComfyUI/custom_nodes/comfyui-manager
git pull
```
然后重新启动 ComfyUI。
## 自定义节点版本安装方法
在现有 ComfyUI 安装基础上安装 ComfyUI-Manager:
1. 在终端中导航到 `ComfyUI/custom_nodes` 目录
2. 克隆仓库:
```bash theme={null}
git clone https://github.com/Comfy-Org/ComfyUI-Manager comfyui-manager
```
3. 安装管理器依赖:
```bash theme={null}
cd comfyui-manager
pip install -r requirements.txt
```
4. 重启 ComfyUI
1. 安装 [Git for Windows](https://git-scm.com/download/win)(独立版本,选择"使用 Windows 默认控制台窗口")
2. 将 [install-manager-for-portable-version.bat](https://github.com/Comfy-Org/ComfyUI-Manager/raw/main/scripts/install-manager-for-portable-version.bat) 下载到您的 `ComfyUI_windows_portable` 目录
3. 双击批处理文件进行安装
comfy-cli 提供各种功能,可从命令行管理 ComfyUI。
**前提条件**:Python 3、Git
**Windows:**
```bash theme={null}
python -m venv venv
venv\Scripts\activate
pip install comfy-cli
comfy install
```
**Linux/macOS:**
```bash theme={null}
python -m venv venv
. venv/bin/activate
pip install comfy-cli
comfy install
```
另请参阅:[comfy-cli 文档](/zh/comfy-cli/getting-started)
**前提条件**:python-is-python3、python3-venv、git
1. 将 [install-comfyui-venv-linux.sh](https://github.com/comfy-org/ComfyUI-Manager/raw/main/scripts/install-comfyui-venv-linux.sh) 下载到空的安装目录
2. 运行:
```bash theme={null}
chmod +x install-comfyui-venv-linux.sh
./install-comfyui-venv-linux.sh
```
3. 使用 `./run_gpu.sh` 或 `./run_cpu.sh` 执行 ComfyUI
**安装注意事项:**
* ComfyUI-Manager 文件必须准确位于路径 `ComfyUI/custom_nodes/comfyui-manager`
* 不要直接解压到 `ComfyUI/custom_nodes`(`__init__.py` 等文件不应在该目录中)
* 不要安装在 `ComfyUI/custom_nodes/ComfyUI-Manager/ComfyUI-Manager` 或 `ComfyUI/custom_nodes/ComfyUI-Manager-main` 等路径
This documentation is built and hosted on [Mintlify](https://mintlify.com), a developer documentation platform.
## 更新 ComfyUI-Manager
ComfyUI-Manager 是与 ComfyUI 本体分开的 Python 包,ComfyUI 本体通过 `manager_requirements.txt` 固定它所对应的版本。管理器的更新方式取决于 ComfyUI 的安装方式:
桌面版内置管理器,并随 Comfy Desktop 的更新保持为最新。请从[管理面板](/zh/installation/desktop/usage/manage#更新选项卡)更新 ComfyUI 引擎。
更新 ComfyUI 后,已安装的管理器包可能不会随之更新。请在启动 ComfyUI 的环境中安装管理器依赖,并使用 `--enable-manager` 重启 ComfyUI:
```bash theme={null}
# 便携版(Windows)
.\python_embeded\python.exe -m pip install -r ComfyUI\manager_requirements.txt
.\python_embeded\python.exe -s ComfyUI\main.py --windows-standalone-build --enable-manager
# 手动安装
pip install -r manager_requirements.txt
python main.py --enable-manager
```
如果你自己将管理器克隆到了 `custom_nodes` 中:
```bash theme={null}
cd ComfyUI/custom_nodes/comfyui-manager
git pull
```
然后重新启动 ComfyUI。
## 自定义节点版本安装方法
在现有 ComfyUI 安装基础上安装 ComfyUI-Manager:
1. 在终端中导航到 `ComfyUI/custom_nodes` 目录
2. 克隆仓库:
```bash theme={null}
git clone https://github.com/Comfy-Org/ComfyUI-Manager comfyui-manager
```
3. 安装管理器依赖:
```bash theme={null}
cd comfyui-manager
pip install -r requirements.txt
```
4. 重启 ComfyUI
1. 安装 [Git for Windows](https://git-scm.com/download/win)(独立版本,选择"使用 Windows 默认控制台窗口")
2. 将 [install-manager-for-portable-version.bat](https://github.com/Comfy-Org/ComfyUI-Manager/raw/main/scripts/install-manager-for-portable-version.bat) 下载到您的 `ComfyUI_windows_portable` 目录
3. 双击批处理文件进行安装
comfy-cli 提供各种功能,可从命令行管理 ComfyUI。
**前提条件**:Python 3、Git
**Windows:**
```bash theme={null}
python -m venv venv
venv\Scripts\activate
pip install comfy-cli
comfy install
```
**Linux/macOS:**
```bash theme={null}
python -m venv venv
. venv/bin/activate
pip install comfy-cli
comfy install
```
另请参阅:[comfy-cli 文档](/zh/comfy-cli/getting-started)
**前提条件**:python-is-python3、python3-venv、git
1. 将 [install-comfyui-venv-linux.sh](https://github.com/comfy-org/ComfyUI-Manager/raw/main/scripts/install-comfyui-venv-linux.sh) 下载到空的安装目录
2. 运行:
```bash theme={null}
chmod +x install-comfyui-venv-linux.sh
./install-comfyui-venv-linux.sh
```
3. 使用 `./run_gpu.sh` 或 `./run_cpu.sh` 执行 ComfyUI
**安装注意事项:**
* ComfyUI-Manager 文件必须准确位于路径 `ComfyUI/custom_nodes/comfyui-manager`
* 不要直接解压到 `ComfyUI/custom_nodes`(`__init__.py` 等文件不应在该目录中)
* 不要安装在 `ComfyUI/custom_nodes/ComfyUI-Manager/ComfyUI-Manager` 或 `ComfyUI/custom_nodes/ComfyUI-Manager-main` 等路径
This documentation is built and hosted on [Mintlify](https://mintlify.com), a developer documentation platform.