> ## Documentation Index
> Fetch the complete documentation index at: https://dripart-matt-router-pricing-pika-and-guard.mintlify.site/llms.txt
> Use this file to discover all available pages before exploring further.
# Comfy Desktop Snapshots
> Back up, restore, and share ComfyUI instance configurations in Comfy Desktop
A snapshot records your instance's current state, including:
* **ComfyUI version**:which build of ComfyUI is installed
* **Custom nodes**:every custom node with its version or commit hash
* **pip packages**:all Python packages installed in the environment
Snapshots serve as restore points: roll back after a broken update, clone an installation, or share a working configuration with a teammate.
Comfy Desktop automatically creates snapshots on key events: every boot, restart, before/after an update, and after a restore. You can also manually create snapshots at any time (up to 200 auto-snapshots per install).
## Accessing Snapshots
From any instance card, click the **⋮ menu** (1) and select **Restore Snapshot** (2) to open the Snapshots tab directly.
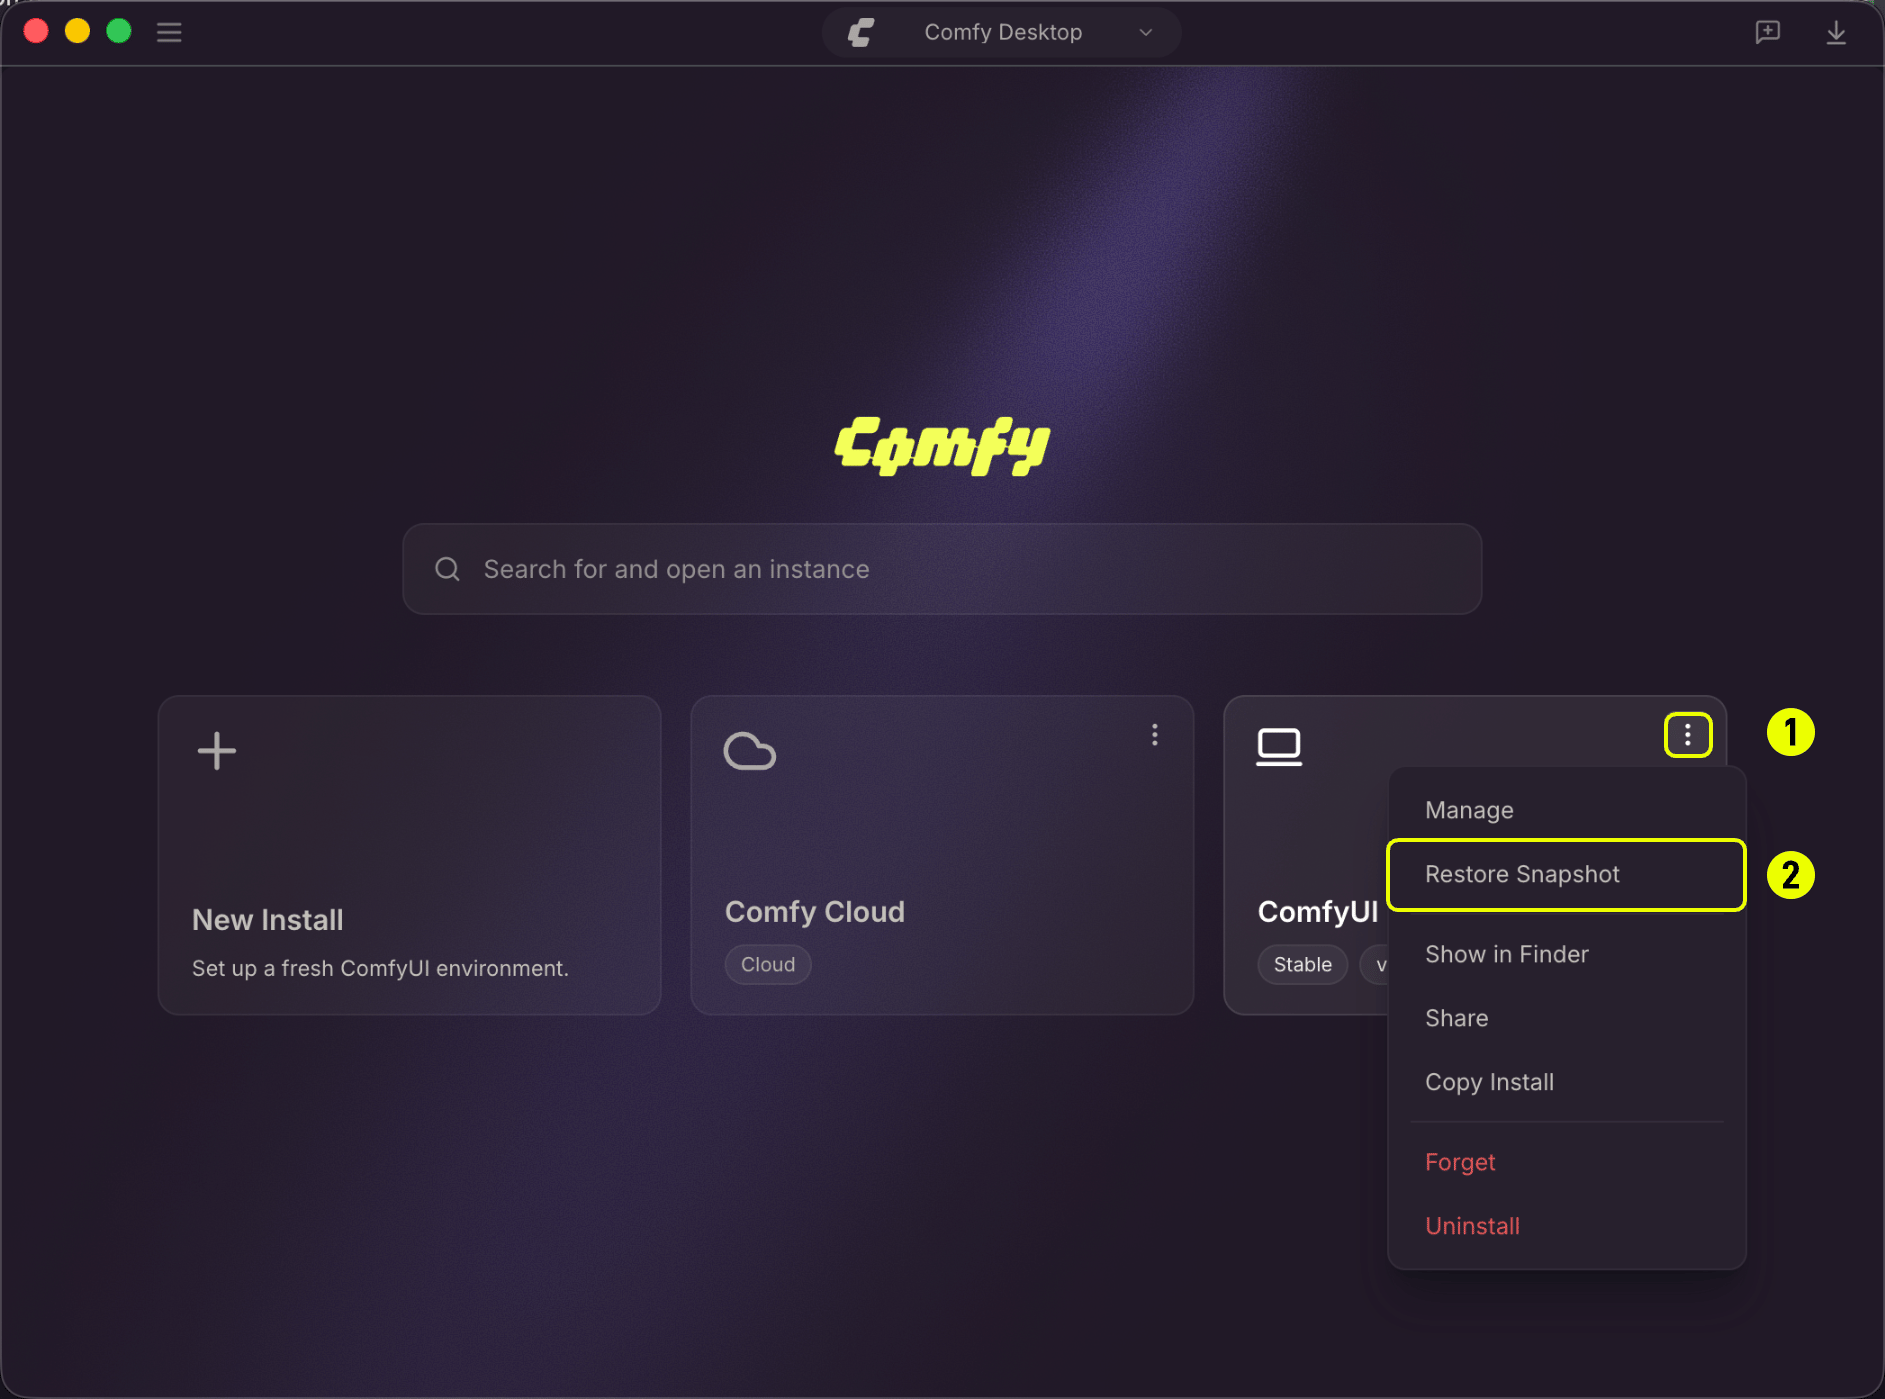 Alternatively, open the **Manage** panel on any instance card and navigate to the **Snapshots** tab.
## Snapshots Tab Overview
The Snapshots tab is your hub for managing all snapshot actions. The timeline shows snapshots for the instance, newest first, and tags each entry with how it was created: **Boot**, **Manager**, **Update**, **Updated**, **Restored**, or **Manual**. If the instance was copied to or from another instance, the timeline also lists that copy. Key actions available:
Alternatively, open the **Manage** panel on any instance card and navigate to the **Snapshots** tab.
## Snapshots Tab Overview
The Snapshots tab is your hub for managing all snapshot actions. The timeline shows snapshots for the instance, newest first, and tags each entry with how it was created: **Boot**, **Manager**, **Update**, **Updated**, **Restored**, or **Manual**. If the instance was copied to or from another instance, the timeline also lists that copy. Key actions available:
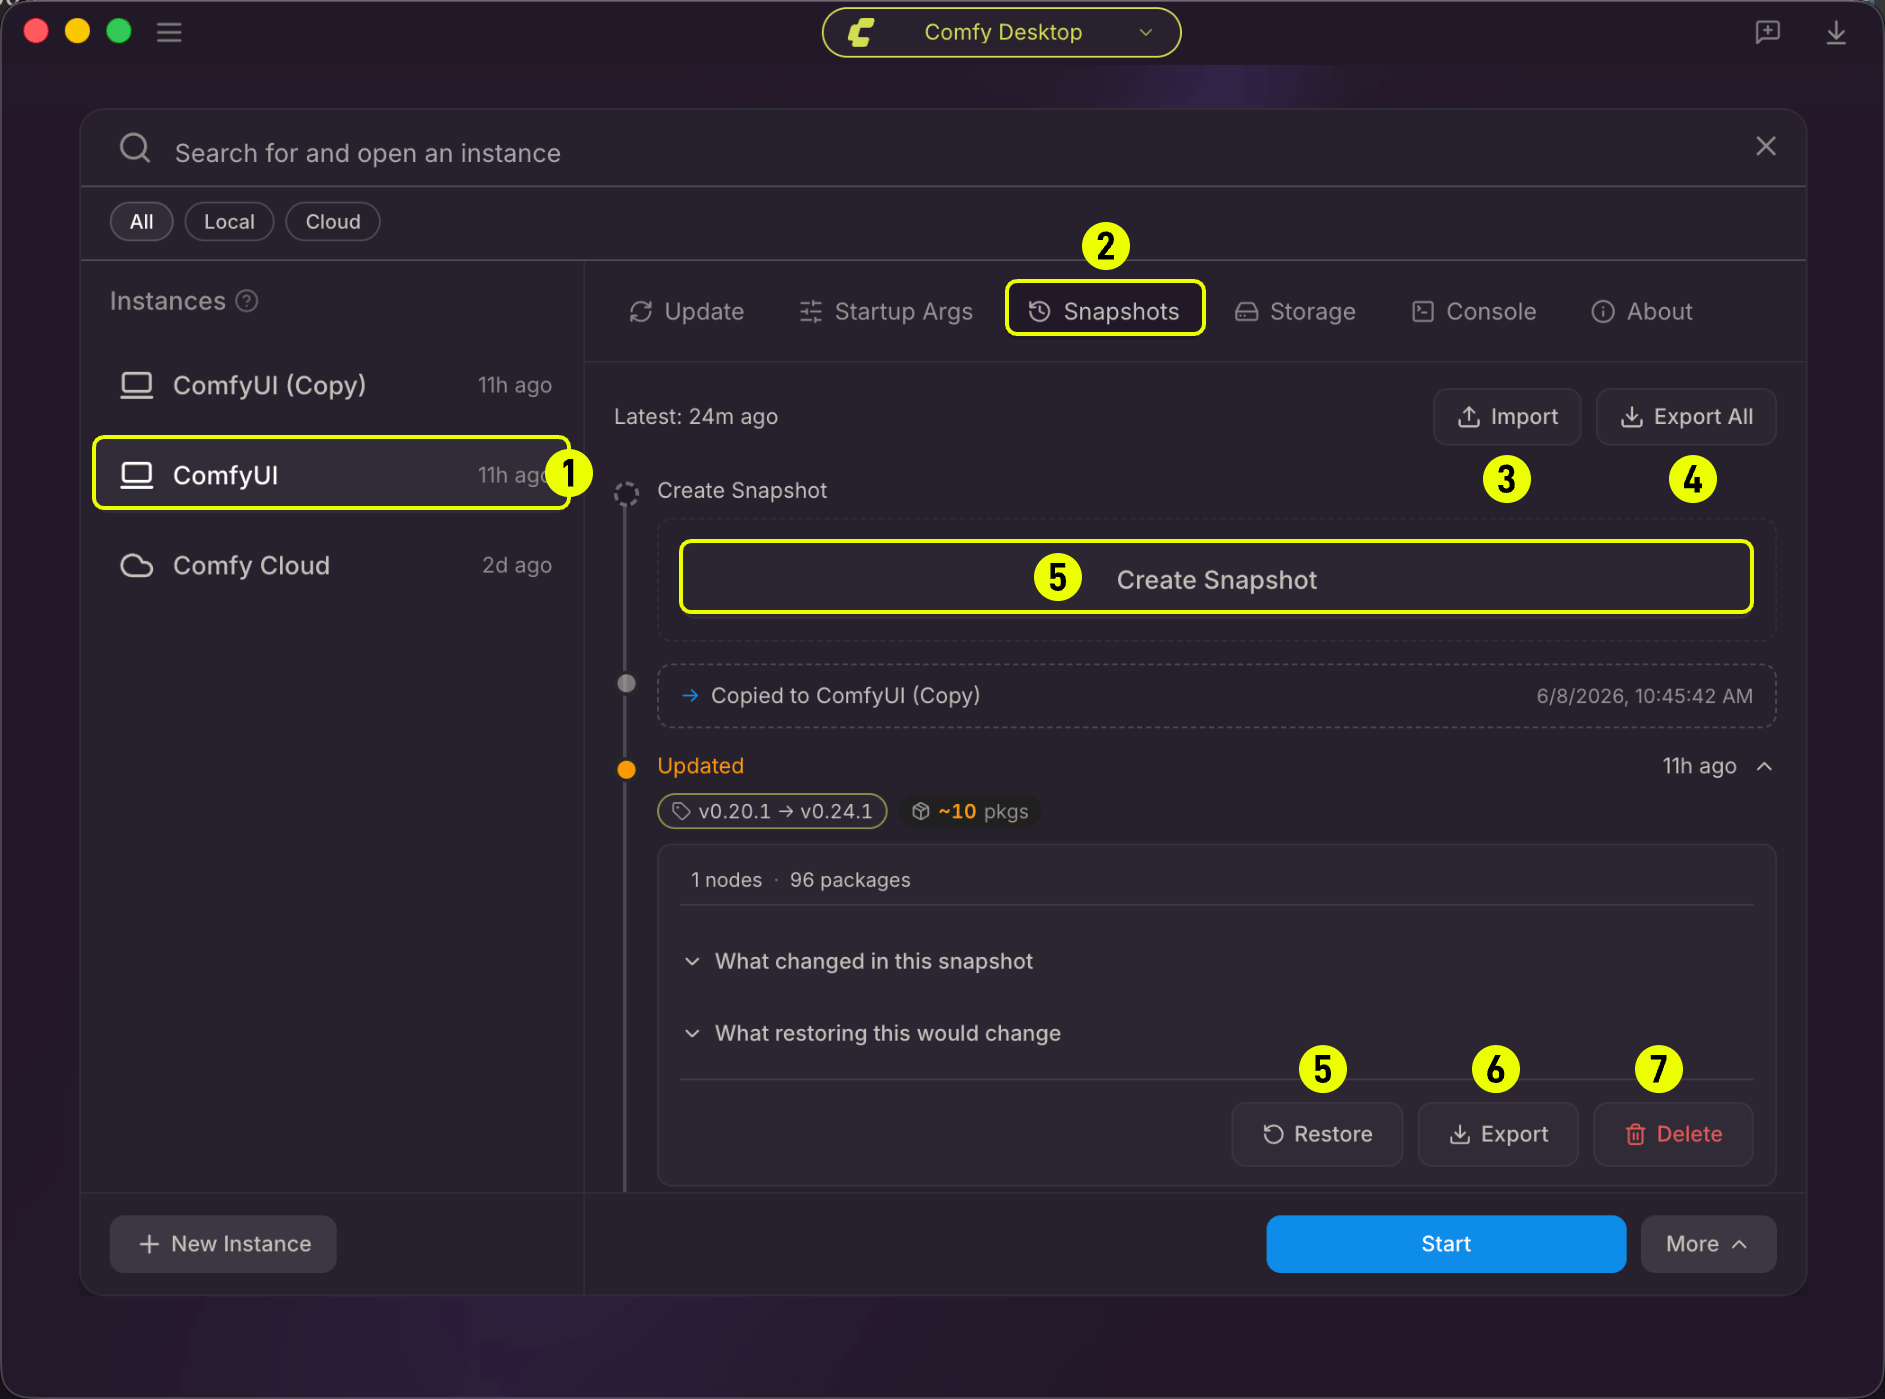 1. **Selected instance**: The instance whose snapshots are shown in the timeline.
2. **Snapshots tab**: Currently active tab in the Manage panel.
3. **Import**: Import a snapshot file exported by another user or instance.
4. **Export All**: Export all snapshots for this instance as a single `.json` file.
5. **Create Snapshot**: Create a manual snapshot of the current instance state.
6. **Export**: Export a single snapshot from the timeline.
7. **Delete**: Delete a single snapshot from the timeline.
**Restore**: Restore the instance to a specific snapshot's state.
### Create a Manual Snapshot
Click **Create Snapshot** (5) in the Snapshots tab header. You can optionally add a label (e.g. "Before adding LCM LoRA") to identify it later. The snapshot will capture:
* Current ComfyUI Git commit
* All enabled custom nodes (git clone URL + commit, or CNR ID + version)
* All pip packages from `pip freeze`
Manual snapshots don't count toward the auto-snapshot limit and can be deleted individually.
### View Snapshot Details
Click any row to expand it. A collapsed row already shows how the snapshot was created, when it was taken, the ComfyUI version, and pills summarizing how many nodes and packages were added, removed, or changed against the previous snapshot. The newest snapshot also carries a **Latest** badge.
The expanded view shows the snapshot's total node and package counts, its label if it has one, and two collapsible diffs:
* **What changed in this snapshot**:Compares this snapshot with the one right before it. Hidden for the oldest snapshot in the timeline.
* **What restoring this would change**:Compares this snapshot with the instance's current state. Hidden for the newest snapshot in the timeline.
The **Restore**, **Export**, and **Delete** buttons for that snapshot also live in this expanded view. The newest snapshot in the timeline has no **Restore** button.
### Restore from a Snapshot
1. In the Snapshots tab, find the snapshot you want to restore.
2. Click **Restore**:a preview shows the diff (what will change).
3. Review the changes and click **Confirm** to begin the restore process.
During restoration, Comfy Desktop will:
1. **Check out the recorded ComfyUI version** (Git commit)
2. **Install missing custom nodes**, switch versions, and enable/disable nodes as needed
3. **Restore pip packages**: install missing packages, upgrade/downgrade to the recorded version, and remove extras
4. **Run post-install scripts** for any newly installed or version-switched custom nodes
The process can be cancelled at any time. If cancelled or if a package install fails, the system automatically rolls back to the pre-restore state using a built-in backup.
After a successful restore, Comfy Desktop automatically creates a `post-restore` snapshot so you can undo the restoration if needed.
### Import a Snapshot into an Instance
Use **Import** in the Snapshots tab to bring a snapshot file into the instance's own history. Only the newest snapshot in the file is applied. If the environment can be reproduced exactly, that snapshot is added to the timeline; otherwise Comfy Desktop saves a snapshot of the resulting state instead, and older snapshots in the file are ignored. If the snapshot's PyTorch build cannot be applied on this machine, Comfy Desktop warns you before applying it.
### Delete a Snapshot
Expand any snapshot and click **Delete** to remove it. Comfy Desktop keeps the newest 200 unlabeled Boot and Manager snapshots per installation and removes older ones automatically as new ones are written, so you never clean those up by hand. Snapshots captured manually, before or after an update, or after a restore are never removed automatically, so delete them yourself once you no longer need them.
## Share a Snapshot
Snapshot files are portable: one `.json` file carries the whole configuration, so you can hand it to a teammate or move it to another machine.
Two shortcuts export an instance's **newest** snapshot without opening the Snapshots tab:
* On the instance's card in the Dashboard, open the **⋮** menu and select **Export Snapshot**.
* In the instance picker, open the **More** menu in the footer and select **Share**.
Both open a save dialog and write a single `.json` file. If the instance has no snapshots yet, Comfy Desktop tells you there is nothing to share. To export one specific snapshot, or every snapshot at once, use **Export** and **Export All** in the Snapshots tab.
A recipient can either create a new instance from the file or import it into an instance they already have.
## Create an Instance from a Snapshot File
If someone shares a snapshot file with you, you can use it to spin up a new ComfyUI instance with the exact same configuration.
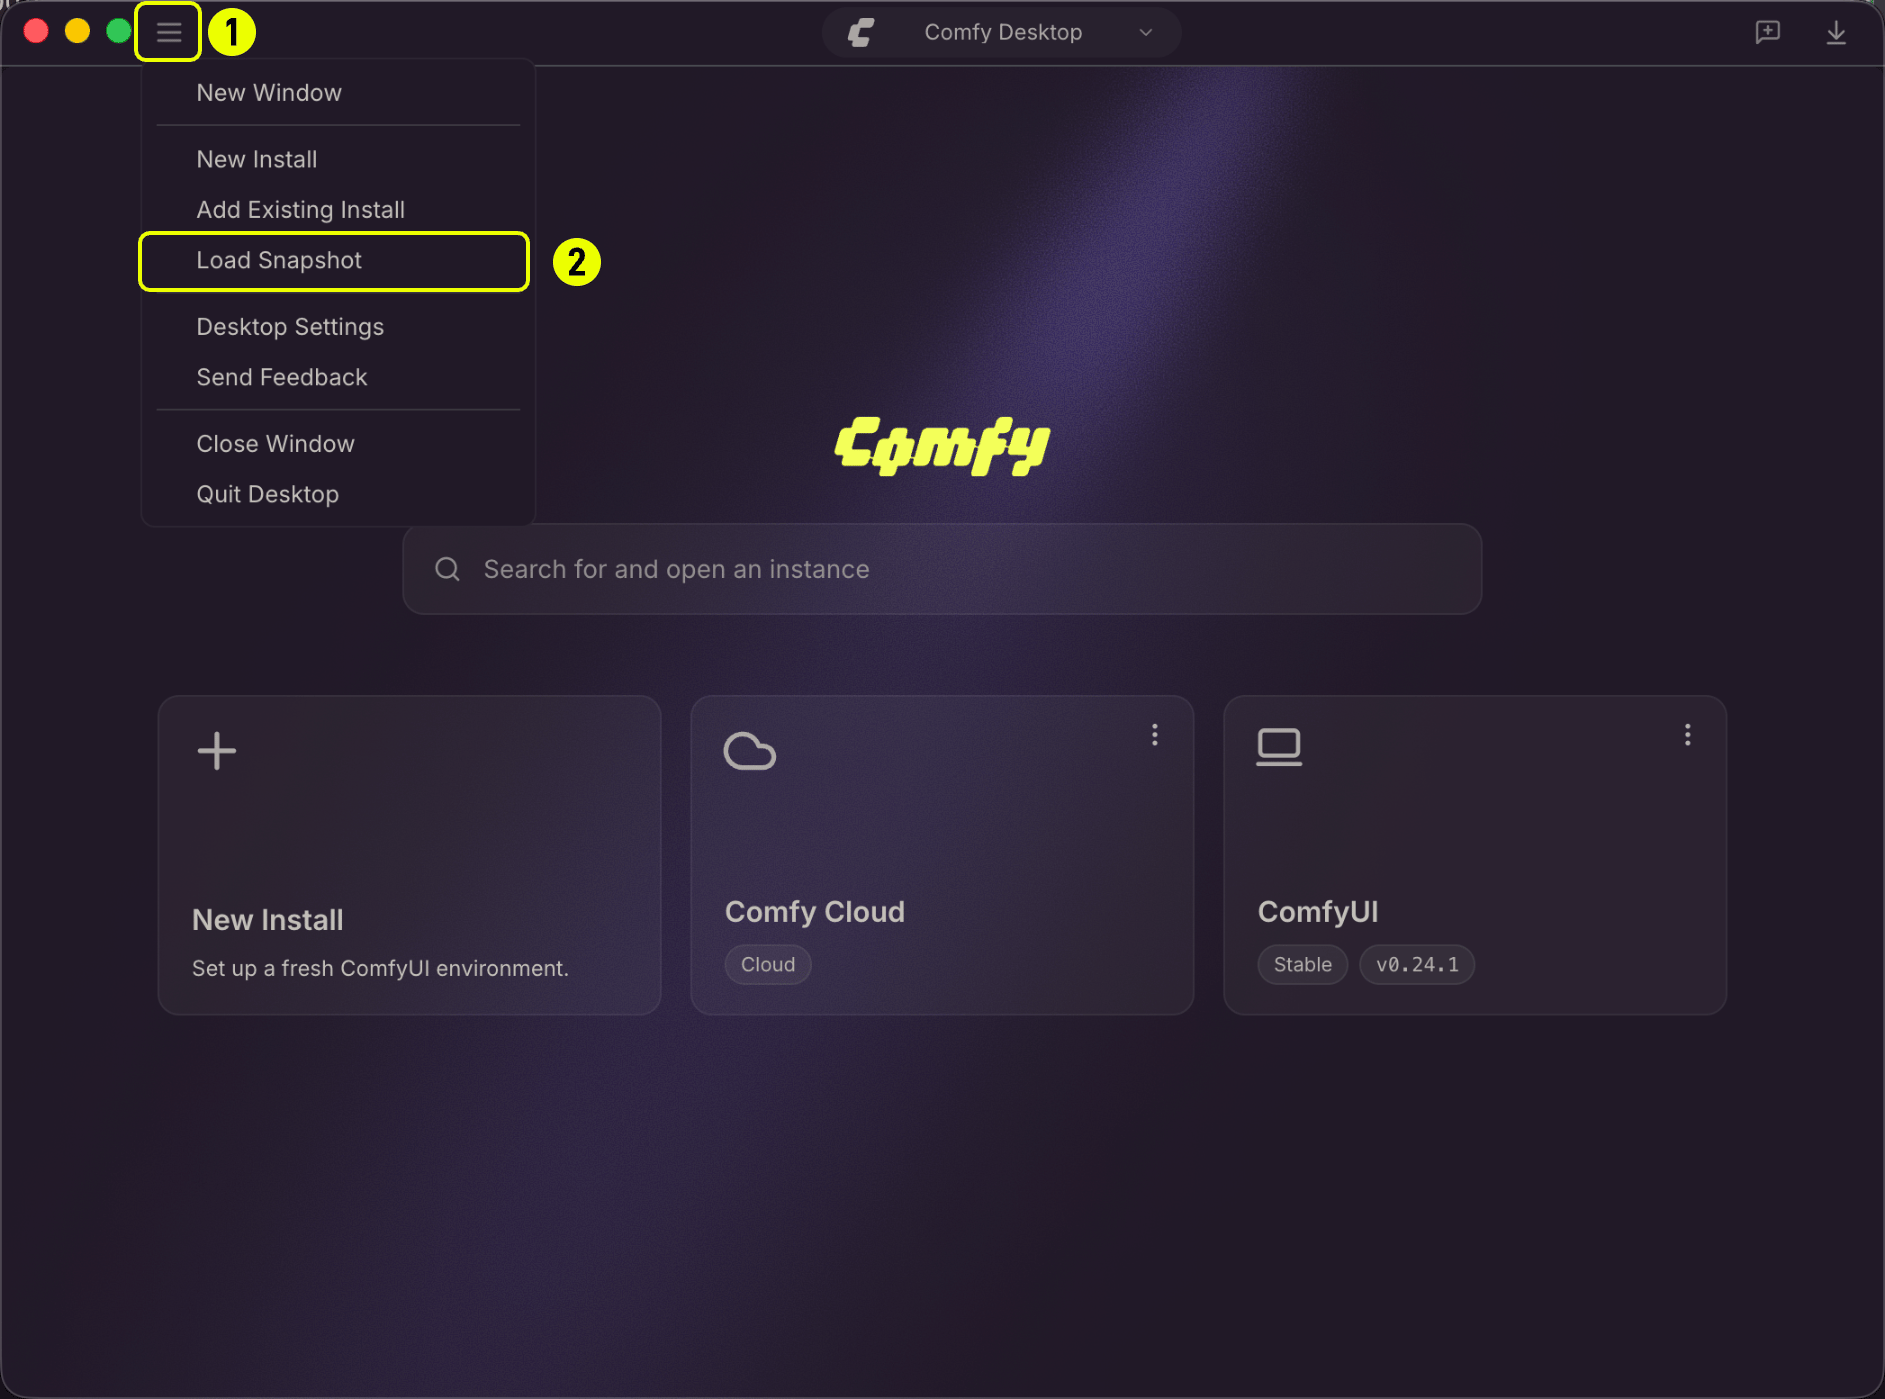
1. Click the **☰ menu** (1) in the top-left corner of the Chooser view and select **Load Snapshot** (2).
1. **Selected instance**: The instance whose snapshots are shown in the timeline.
2. **Snapshots tab**: Currently active tab in the Manage panel.
3. **Import**: Import a snapshot file exported by another user or instance.
4. **Export All**: Export all snapshots for this instance as a single `.json` file.
5. **Create Snapshot**: Create a manual snapshot of the current instance state.
6. **Export**: Export a single snapshot from the timeline.
7. **Delete**: Delete a single snapshot from the timeline.
**Restore**: Restore the instance to a specific snapshot's state.
### Create a Manual Snapshot
Click **Create Snapshot** (5) in the Snapshots tab header. You can optionally add a label (e.g. "Before adding LCM LoRA") to identify it later. The snapshot will capture:
* Current ComfyUI Git commit
* All enabled custom nodes (git clone URL + commit, or CNR ID + version)
* All pip packages from `pip freeze`
Manual snapshots don't count toward the auto-snapshot limit and can be deleted individually.
### View Snapshot Details
Click any row to expand it. A collapsed row already shows how the snapshot was created, when it was taken, the ComfyUI version, and pills summarizing how many nodes and packages were added, removed, or changed against the previous snapshot. The newest snapshot also carries a **Latest** badge.
The expanded view shows the snapshot's total node and package counts, its label if it has one, and two collapsible diffs:
* **What changed in this snapshot**:Compares this snapshot with the one right before it. Hidden for the oldest snapshot in the timeline.
* **What restoring this would change**:Compares this snapshot with the instance's current state. Hidden for the newest snapshot in the timeline.
The **Restore**, **Export**, and **Delete** buttons for that snapshot also live in this expanded view. The newest snapshot in the timeline has no **Restore** button.
### Restore from a Snapshot
1. In the Snapshots tab, find the snapshot you want to restore.
2. Click **Restore**:a preview shows the diff (what will change).
3. Review the changes and click **Confirm** to begin the restore process.
During restoration, Comfy Desktop will:
1. **Check out the recorded ComfyUI version** (Git commit)
2. **Install missing custom nodes**, switch versions, and enable/disable nodes as needed
3. **Restore pip packages**: install missing packages, upgrade/downgrade to the recorded version, and remove extras
4. **Run post-install scripts** for any newly installed or version-switched custom nodes
The process can be cancelled at any time. If cancelled or if a package install fails, the system automatically rolls back to the pre-restore state using a built-in backup.
After a successful restore, Comfy Desktop automatically creates a `post-restore` snapshot so you can undo the restoration if needed.
### Import a Snapshot into an Instance
Use **Import** in the Snapshots tab to bring a snapshot file into the instance's own history. Only the newest snapshot in the file is applied. If the environment can be reproduced exactly, that snapshot is added to the timeline; otherwise Comfy Desktop saves a snapshot of the resulting state instead, and older snapshots in the file are ignored. If the snapshot's PyTorch build cannot be applied on this machine, Comfy Desktop warns you before applying it.
### Delete a Snapshot
Expand any snapshot and click **Delete** to remove it. Comfy Desktop keeps the newest 200 unlabeled Boot and Manager snapshots per installation and removes older ones automatically as new ones are written, so you never clean those up by hand. Snapshots captured manually, before or after an update, or after a restore are never removed automatically, so delete them yourself once you no longer need them.
## Share a Snapshot
Snapshot files are portable: one `.json` file carries the whole configuration, so you can hand it to a teammate or move it to another machine.
Two shortcuts export an instance's **newest** snapshot without opening the Snapshots tab:
* On the instance's card in the Dashboard, open the **⋮** menu and select **Export Snapshot**.
* In the instance picker, open the **More** menu in the footer and select **Share**.
Both open a save dialog and write a single `.json` file. If the instance has no snapshots yet, Comfy Desktop tells you there is nothing to share. To export one specific snapshot, or every snapshot at once, use **Export** and **Export All** in the Snapshots tab.
A recipient can either create a new instance from the file or import it into an instance they already have.
## Create an Instance from a Snapshot File
If someone shares a snapshot file with you, you can use it to spin up a new ComfyUI instance with the exact same configuration.
1. Click the **☰ menu** (1) in the top-left corner of the Chooser view and select **Load Snapshot** (2).
 2. Browse your file system and select the `.json` snapshot file.
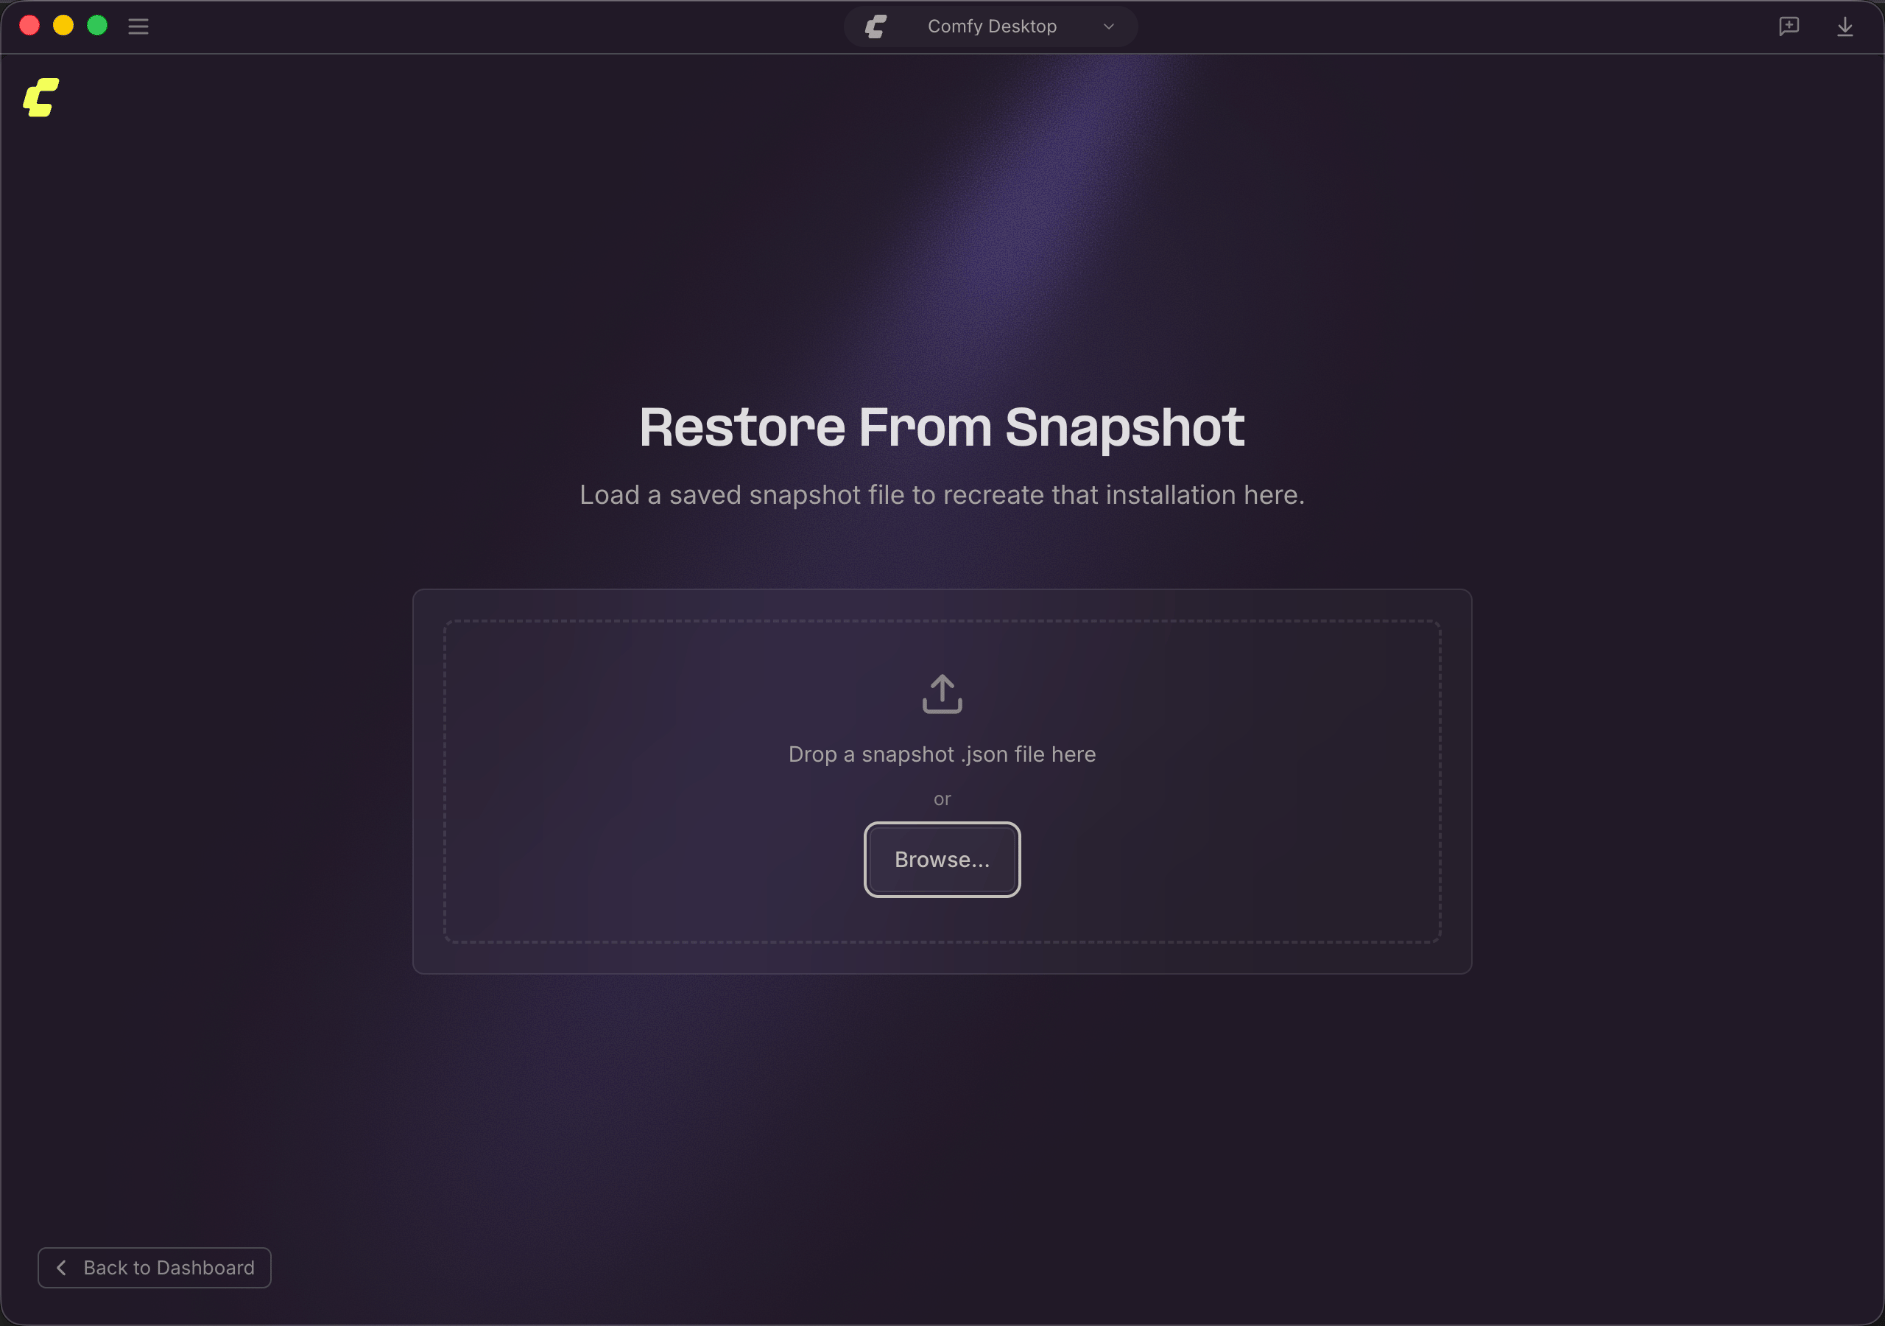 3. A preview shows the snapshot contents: source instance name, ComfyUI version, custom nodes, and pip packages. Review the details, then click **Create Installation** to build a new instance from the snapshot.
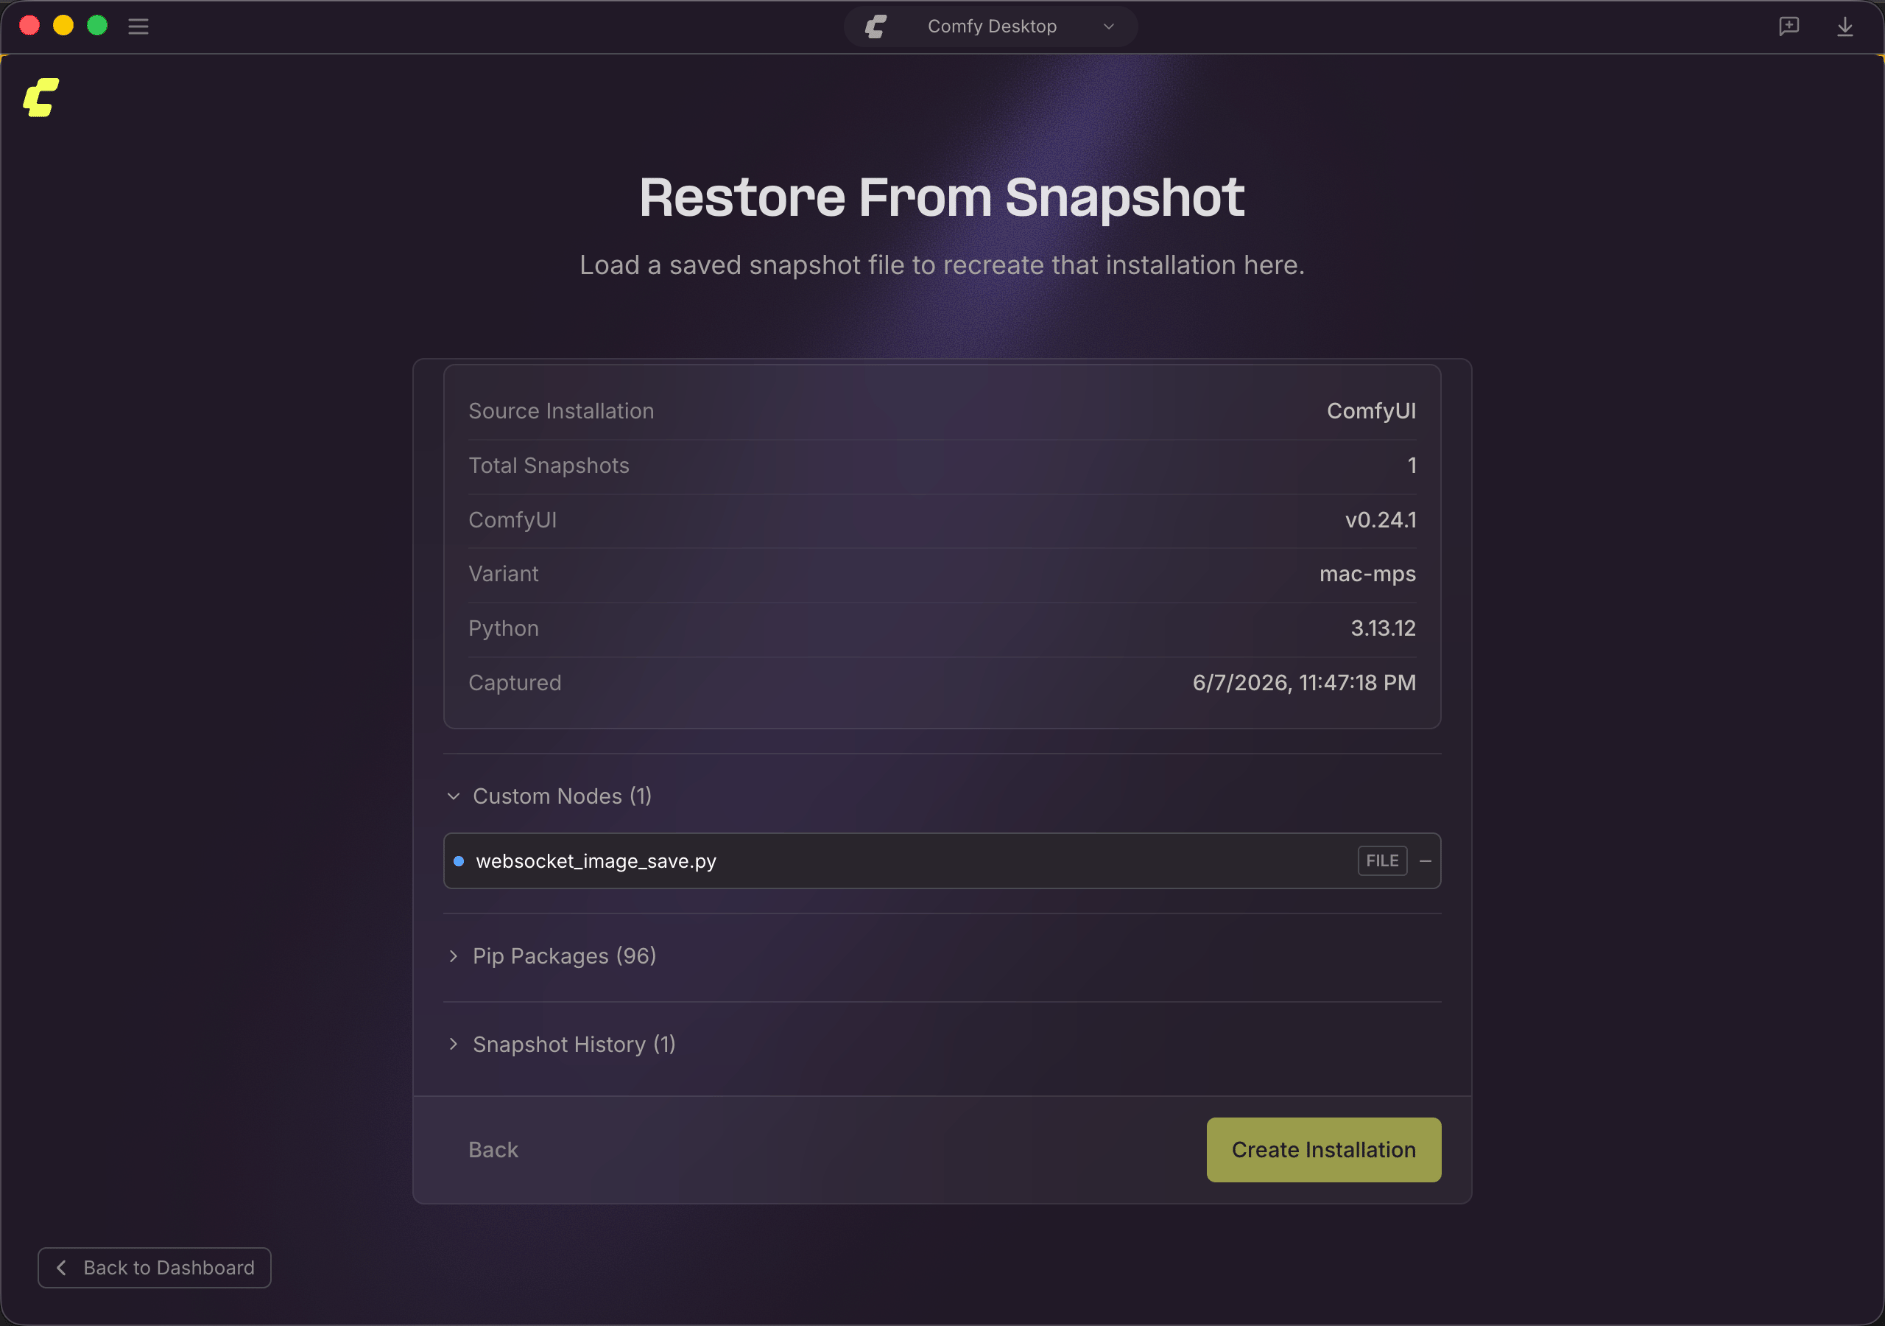 This creates a brand new standalone instance, and the original instance is untouched. You'll see it appear in the Chooser view alongside your other instances.
This documentation is built and hosted on [Mintlify](https://mintlify.com), a developer documentation platform.
This creates a brand new standalone instance, and the original instance is untouched. You'll see it appear in the Chooser view alongside your other instances.
This documentation is built and hosted on [Mintlify](https://mintlify.com), a developer documentation platform.